Developer Guide
Table of Contents
- Acknowledgements
- Setting up, getting started
- Design
- Implementation
- Documentation, logging, testing, configuration, dev-ops
- Appendix: Requirements
- Appendix: Instructions for manual testing
- Appendix: Efforts
- Appendix: Planned Enhancements
Acknowledgements
- Adapted from AB3
Setting up, getting started
Refer to the guide Setting up and getting started.
Design
.puml files used to create diagrams in this document docs/diagrams folder. Refer to the PlantUML Tutorial at se-edu/guides to learn how to create and edit diagrams.
Architecture
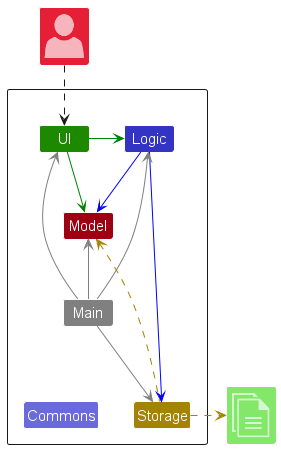
The Architecture Diagram given above explains the high-level design of the App.
Given below is a quick overview of main components and how they interact with each other.
Main components of the architecture
Main (consisting of classes Main and MainApp) is in charge of the app launch and shut down.
- At app launch, it initializes the other components in the correct sequence, and connects them up with each other.
- At shut down, it shuts down the other components and invokes cleanup methods where necessary.
The bulk of the app’s work is done by the following four components:
-
UI: The UI of the App. -
Logic: The command executor. -
Model: Holds the data of the App in memory. -
Storage: Reads data from, and writes data to, the hard disk.
Commons represents a collection of classes used by multiple other components.
How the architecture components interact with each other
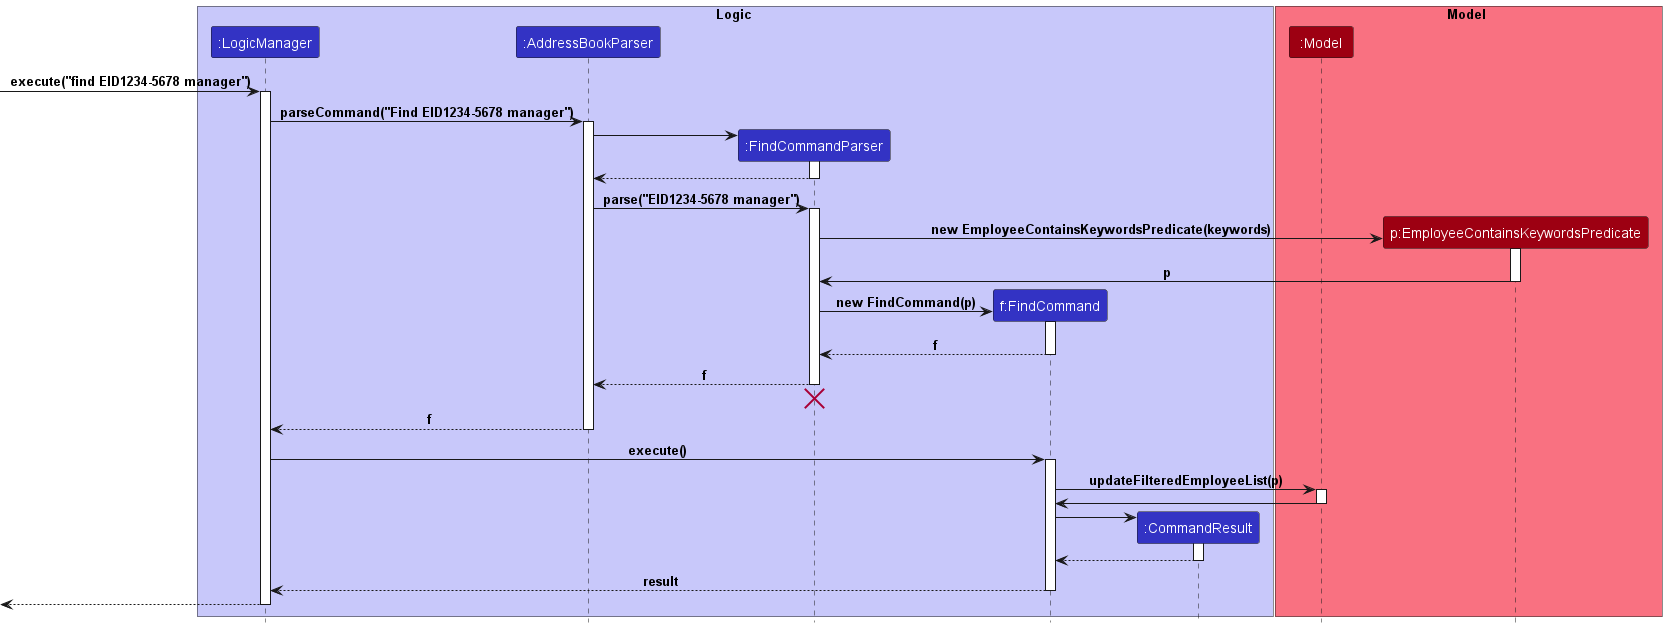
The Sequence Diagram below shows how the components interact with each other for the scenario where the user issues the command delete EID1234-5678.
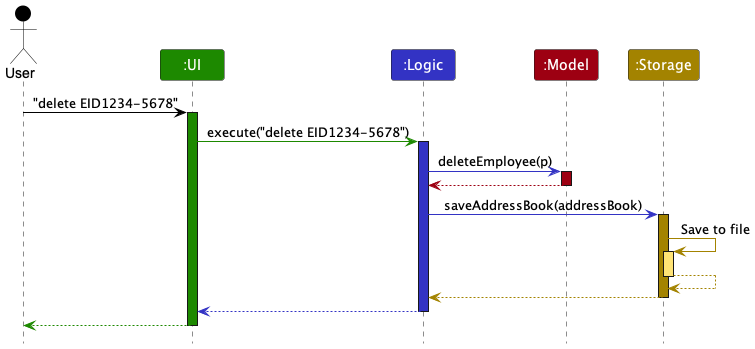
Each of the four main components (also shown in the diagram above),
-
defines its API in an
interfacewith the same name as the Component. -
implements its functionality using a concrete
{Component Name}Managerclass (which follows the corresponding APIinterfacementioned in the previous point).
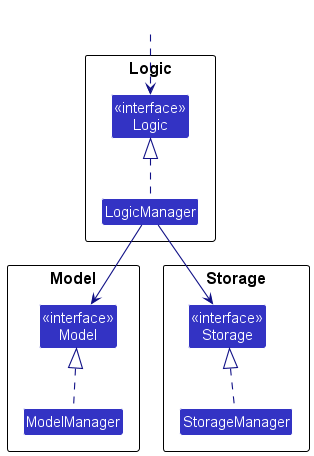
For example, the Logic component defines its API in the Logic.java interface and implements its functionality using the LogicManager.java class which follows the Logic interface. Other components interact with a given component through its interface rather than the concrete class (reason: to prevent outside component’s being coupled to the implementation of a component), as illustrated in the (partial) class diagram below.
The sections below give more details of each component.
UI component
The API of this component is specified in Ui.java
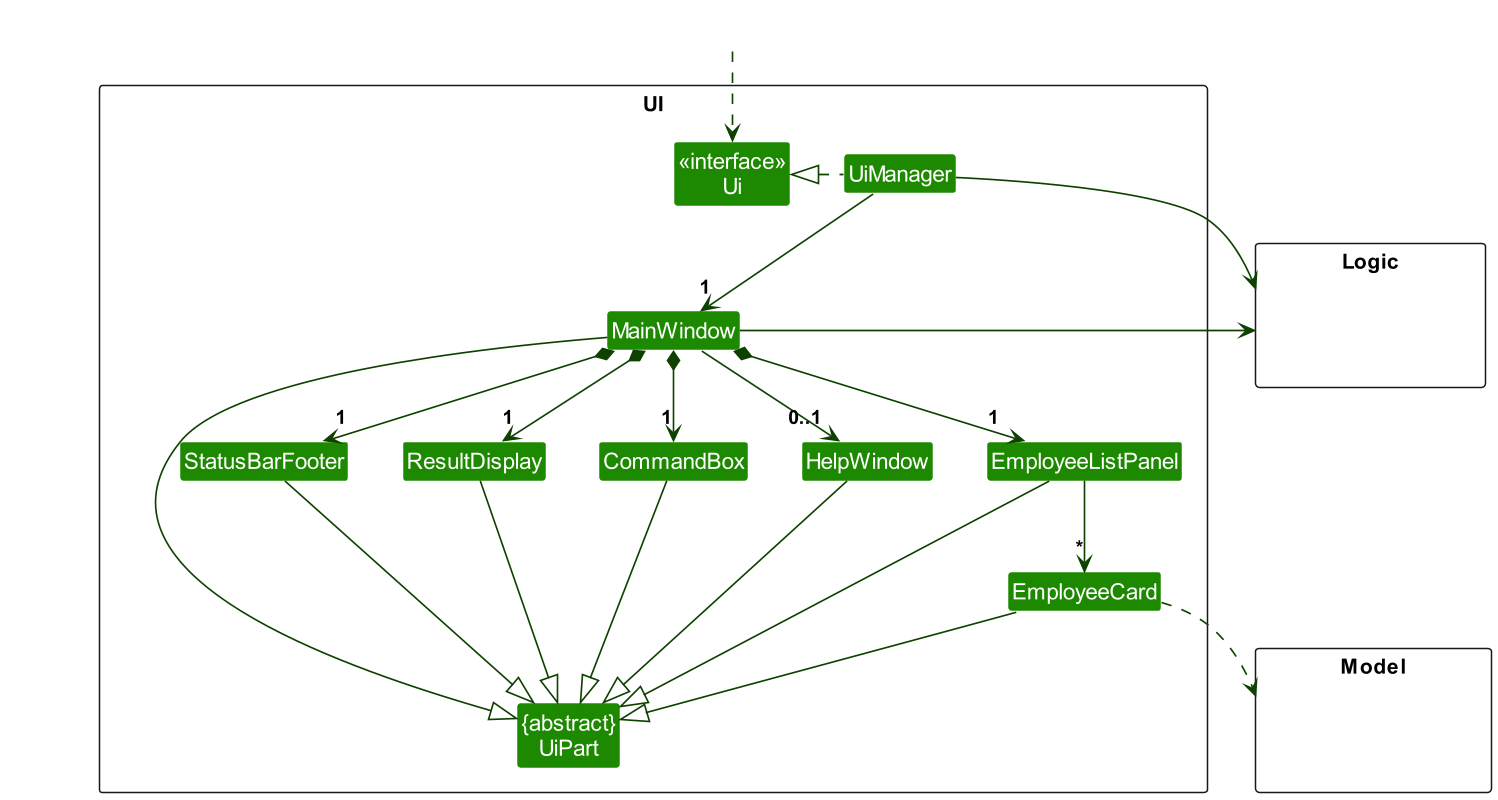
The UI consists of a MainWindow that is made up of parts e.g.CommandBox, ResultDisplay, EmployeeListPanel, StatusBarFooter etc. All these, including the MainWindow, inherit from the abstract UiPart class which captures the commonalities between classes that represent parts of the visible GUI.
The UI component uses the JavaFx UI framework. The layout of these UI parts are defined in matching .fxml files that are in the src/main/resources/view folder. For example, the layout of the MainWindow is specified in MainWindow.fxml
The UI component,
- executes user commands using the
Logiccomponent. - listens for changes to
Modeldata so that the UI can be updated with the modified data. - keeps a reference to the
Logiccomponent, because theUIrelies on theLogicto execute commands. - depends on some classes in the
Modelcomponent, as it displaysEmployeeobject residing in theModel.
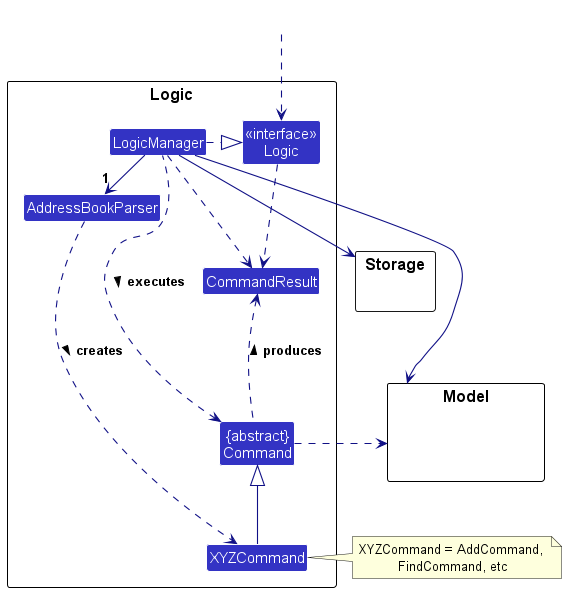
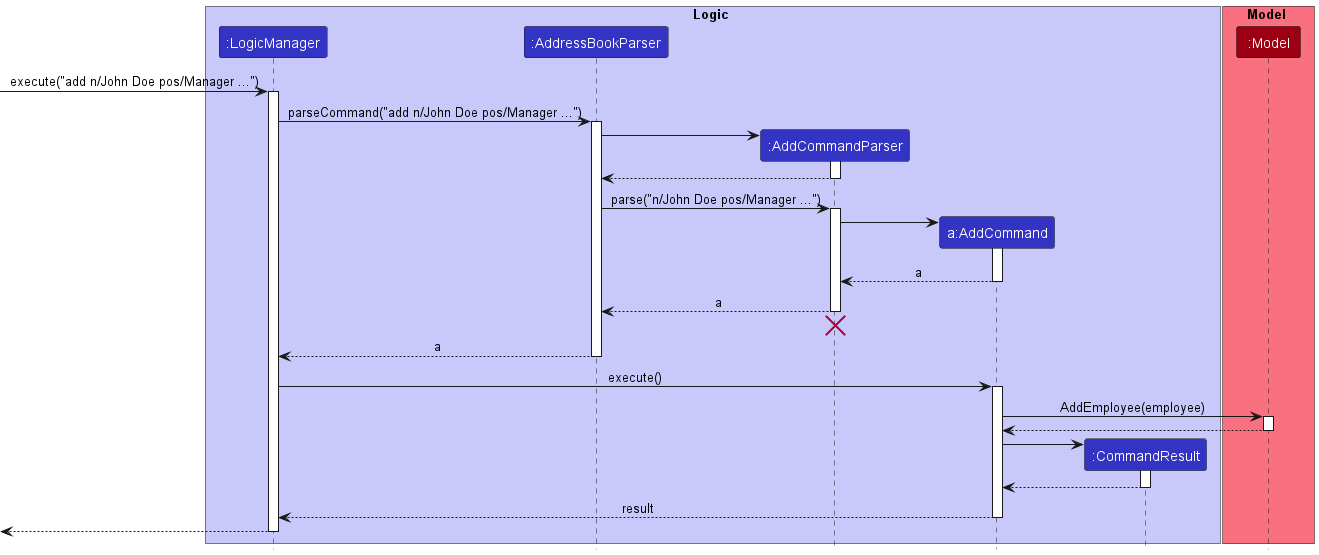
Logic component
API : Logic.java
Here’s a (partial) class diagram of the Logic component:
The sequence diagram below illustrates the interactions within the Logic component, taking execute("delete EID1234-5678") API call as an example.
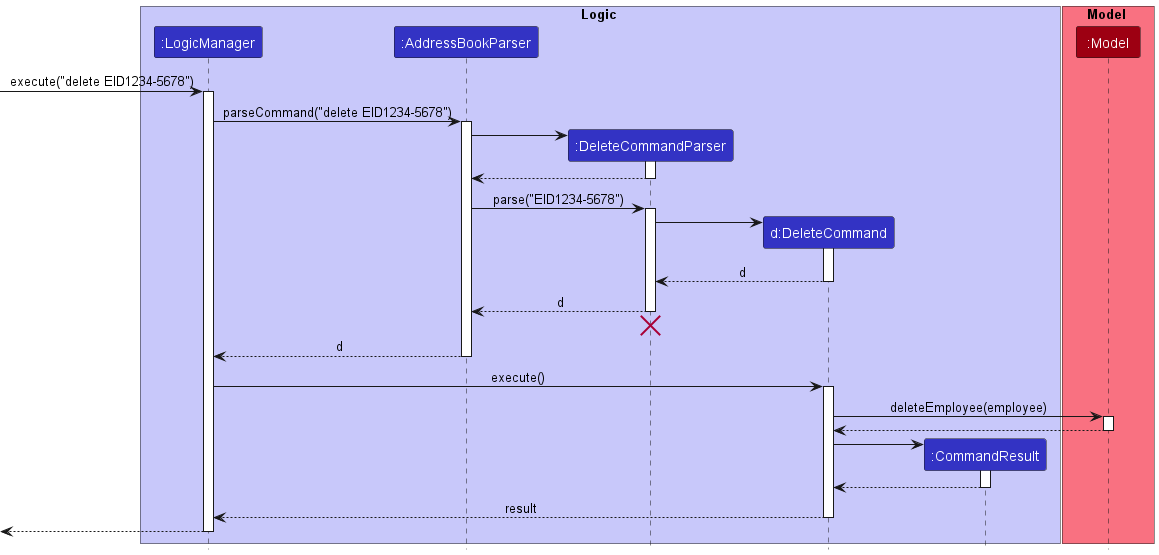
DeleteCommandParser should end at the destroy marker (X) but due to a limitation of PlantUML, the lifeline reaches the end of diagram.
How the Logic component works:
- When
Logicis called upon to execute a command, it is passed to anAddressBookParserobject which in turn creates a parser that matches the command (e.g.,DeleteCommandParser) and uses it to parse the command. - This results in a
Commandobject (more precisely, an object of one of its subclasses e.g.,DeleteCommand) which is executed by theLogicManager. - The command can communicate with the
Modelwhen it is executed (e.g. to delete an employee). - The result of the command execution is encapsulated as a
CommandResultobject which is returned back fromLogic.
Here are the other classes in Logic (omitted from the class diagram above) that are used for parsing a user command:
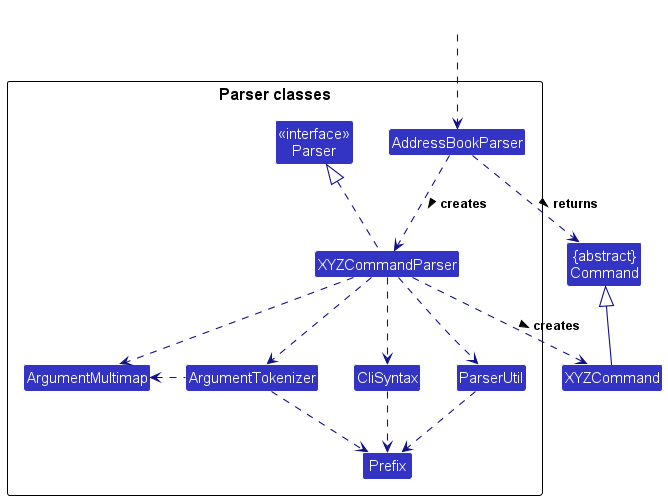
How the parsing works:
- When called upon to parse a user command, the
AddressBookParserclass creates anXYZCommandParser(XYZis a placeholder for the specific command name e.g.,AddCommandParser) which uses the other classes shown above to parse the user command and create aXYZCommandobject (e.g.,AddCommand) which theAddressBookParserreturns back as aCommandobject. - All
XYZCommandParserclasses (e.g.,AddCommandParser,DeleteCommandParser, …) inherit from theParserinterface so that they can be treated similarly where possible e.g, during testing.
Model component
API : Model.java
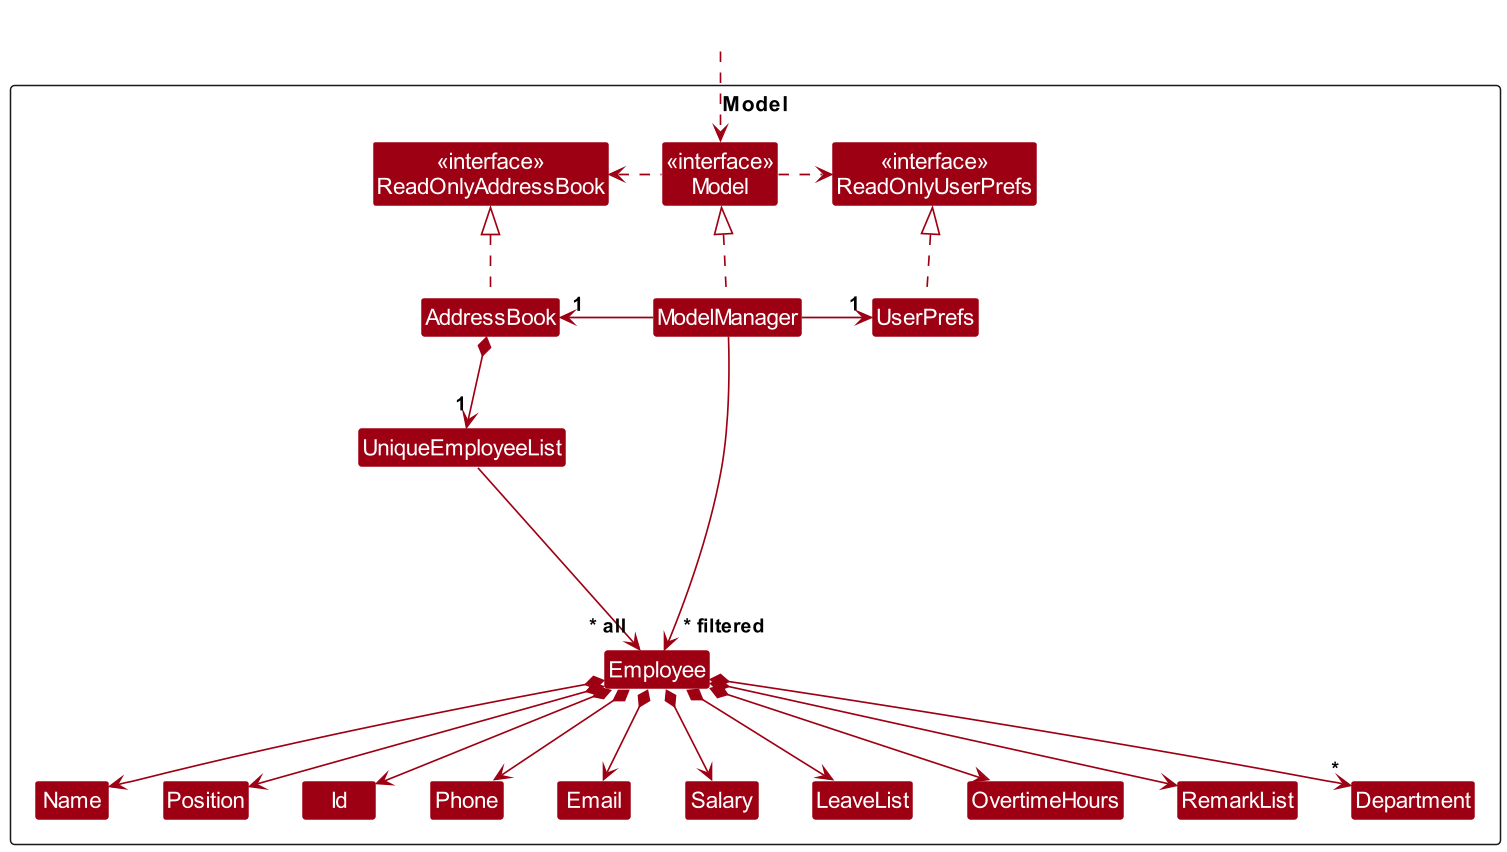
The Model component,
- stores the address book data i.e., all
Employeeobjects (which are contained in aUniqueEmployeeListobject). - stores the currently ‘selected’
Employeeobjects (e.g., results of a search query) as a separate filtered list which is exposed to outsiders as an unmodifiableObservableList<Employee>that can be ‘observed’ e.g. the UI can be bound to this list so that the UI automatically updates when the data in the list change. - stores a
UserPrefobject that represents the user’s preferences. This is exposed to the outside as aReadOnlyUserPrefobjects. - does not depend on any of the other three components (as the
Modelrepresents data entities of the domain, they should make sense on their own without depending on other components)
Department list in the AddressBook, which Employee references. This allows AddressBook to only require one Department object per unique department, instead of each Employee needing their own Department objects.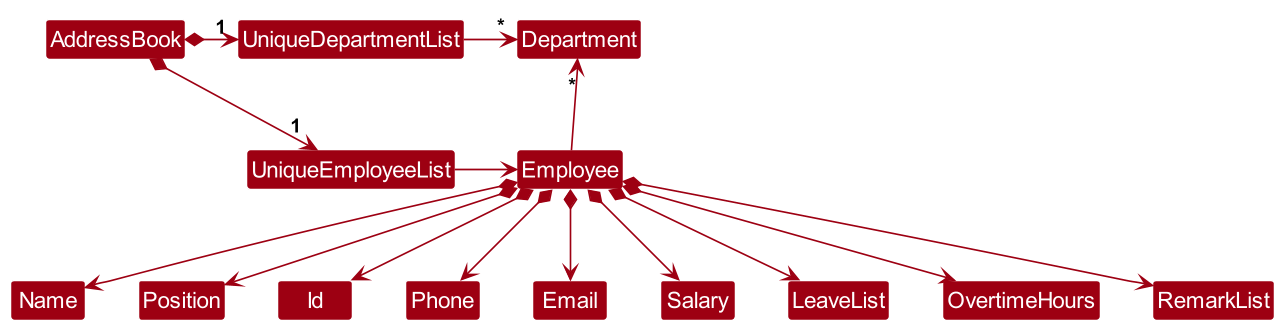
Storage component
API : Storage.java
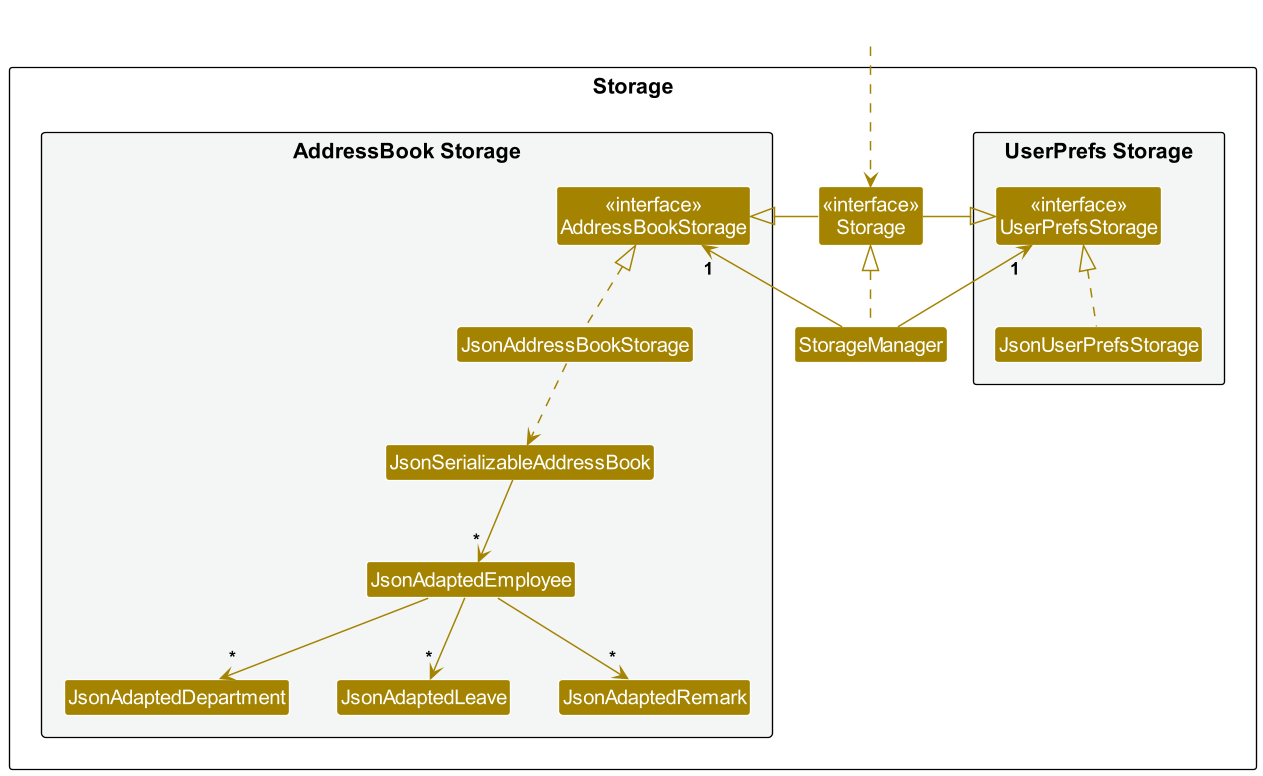
The Storage component,
- can save both address book data and user preference data in JSON format, and read them back into corresponding objects.
- inherits from both
AddressBookStorageandUserPrefStorage, which means it can be treated as either one (if only the functionality of only one is needed). - depends on some classes in the
Modelcomponent (because theStoragecomponent’s job is to save/retrieve objects that belong to theModel)
Common classes
Classes used by multiple components are in the seedu.address.commons package.
Implementation
This section describes some noteworthy details on how certain features are implemented.
Add Employee feature
The add employee feature allows HouR to add employees to the employee list.
Implementation
The add employee command mechanism is facilitated by the AddCommandParser class which implements the Parser interface.
AddCommandParser#parse() is exposed in the Parser interface as Parser#parse().
AddCommandParser implements the following operations:
-
AddCommandParser#parse()— Parses the input arguments by storing the prefixes of its respective values as anArgumentMultimap, and creates a newAddCommandobject with the parsed employee ID, name, phone, email, position, salary, and an optional set of departments.
The AddCommand object then communicates with the Model API by calling the Model#addEmployee(Employee) method, which adds the newly-constructed employee to the existing employee list.
The method AddCommand#execute() returns a CommandResult object, which stores information about the completion of the command.
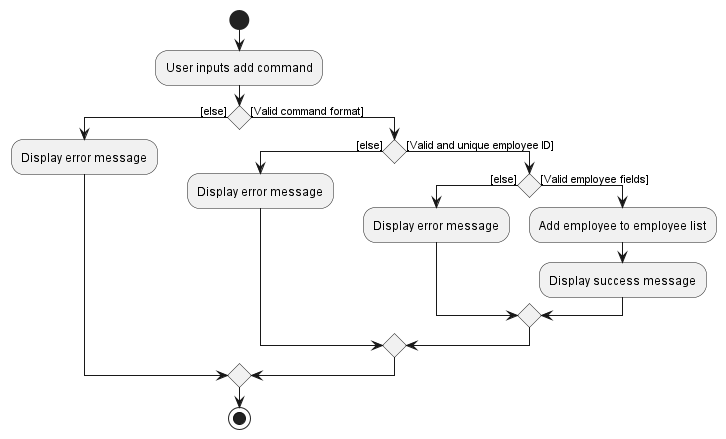
The diagram below details how the operation of adding an employee works.
Given below is an example usage scenario for the command.
Step 1: The user launches the application.
Step 2: The user executes the add id/EMPLOYEE_ID n/NAME p/PHONE e/EMAIL pos/POSITION s/SALARY d/DEPARTMENT command in the CLI.
Step 3: A new employee will be added to the employee list with the given details.
The following activity diagram summarises what happens when a user executes the add command:
Design considerations:
Aspect: Command-Model Interaction:
-
Alternative 1 (current choice): Utilise
model#addEmployeeto add the new employee into the model instead of doing the direct editing inAddCommand#execute().- Pros: Maintain immutability within Employee and Model classes.
- Cons: Longer command execution, requiring more parts to work together.
-
Alternative 2: Edit the employee list directly from
AddCommand#execute().- Pros: Shorter command execution, one less point of failure by eliminating the
modelclass. - Cons: May violate immutability within Employee and Model classes as well as SLAP by having
AddCommand#execute()perform the editing directly.
- Pros: Shorter command execution, one less point of failure by eliminating the
Delete Employee feature
The delete employee feature allows HouR to delete employees from the employee list.
Implementation
The delete employee command mechanism is facilitated by the DeleteCommandParser class which implements the Parser interface.
DeleteCommandParser#parse() is exposed in the Parser interface as Parser#parse().
DeleteCommandParser implements the following operations:
-
DeleteCommandParser#parse()— Parses the input argument by storing the ID, and creates a newDeleteCommandobject with the parsed ID.
The DeleteCommand object then communicates with the Model API by calling the Model#deleteEmployee(Employee) method, which deletes the employee with the given ID from the existing employee list.
The method DeleteCommand#execute() returns a CommandResult object, which stores information about the completion of the command.
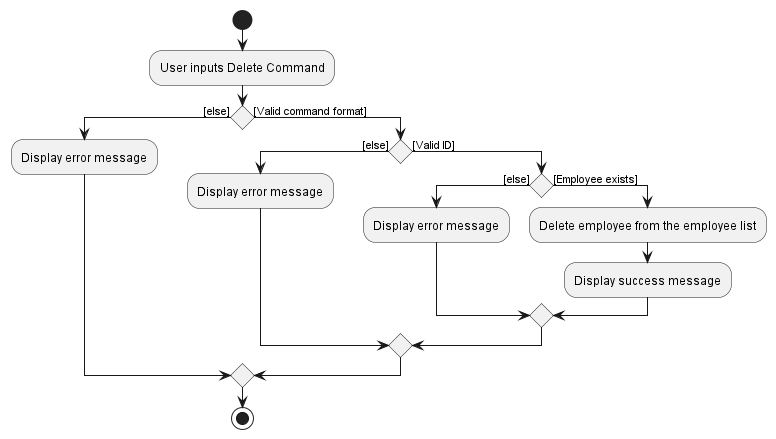
The diagram below details how the operation of deleting an employee works.
Given below is an example usage scenario for the command.
Step 1: The user launches the application.
Step 2: The user executes the delete EMPLOYEE_ID command in the CLI.
Step 3: The employee with the given ID will be deleted from the employee list.
The following activity diagram summarises what happens when a user executes the delete command:
Design considerations:
Aspect: Command-Model Interaction:
-
Alternative 1 (current choice): Utilise
model#deleteEmployeeto delete the employee from the model instead of doing the direct editing inDeleteCommand#execute().- Pros: Maintain immutability within Employee and Model classes.
- Cons: Longer command execution, requiring more parts to work together.
-
Alternative 2: Edit the employee list directly from
DeleteCommand#execute().- Pros: Shorter command execution, one less point of failure by eliminating the
modelclass. - Cons: May violate immutability within Employee and Model classes as well as SLAP by having
DeleteCommand#execute()perform the editing directly.
- Pros: Shorter command execution, one less point of failure by eliminating the
Find Employee feature
The find employee feature allows HouR to find employees that match the given search criteria from the employee list.
Implementation
The find employee command mechanism is facilitated by the FindCommandParser class which implements the Parser interface.
FindCommandParser#parse() is exposed in the Parser interface as Parser#parse().
FindCommandParser implements the following operations:
-
FindCommandParser#parse()— Parses the input argument, splits it into an array of keywords, creates an instance ofEmployeeContainsKeywordsPredicateusing the keywords, and creates a newFindCommandobject with the newly-created predicate instance.
The FindCommand object then communicates with the Model API by calling the Model#updateFilteredEmployeeList(Predicate) method, which updates the view of the application to show all employees that match the given search criteria.
The method FindCommand#execute() returns a CommandResult object, which stores information about the completion of the command.
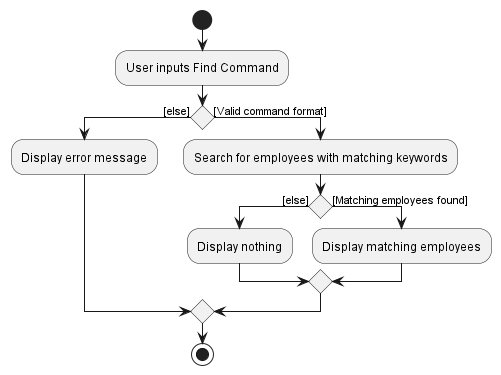
The diagram below details how the operation of finding an employee works.
Given below is an example usage scenario for the command.
Step 1: The user launches the application.
Step 2: The user executes the find KEYWORD [MORE_KEYWORDS]… command in the CLI.
Step 3: The employee list will be updated to show only employees that match the given search criteria.
The following activity diagram summarises what happens when a user executes the find command:
Design considerations:
Aspect: Command-Model Interaction:
-
Alternative 1 (current choice): Utilise
model#updateFilteredEmployeeListto update the view of the application to show all employees that match the given search criteria.- Pros: Maintains data, maintain immutability within the FindCommand and Model classes.
- Cons: Longer command execution, requiring more parts to work together.
-
Alternative 2: Edit the employee list directly from
FindCommand#execute()to display only employees that match the given search criteria.- Pros: Shorter command execution, one less point of failure by eliminating the
modelclass. - Cons: May violate immutability within FindCommand and Model classes as well as SLAP by having
FindCommand#execute()perform the editing directly.
- Pros: Shorter command execution, one less point of failure by eliminating the
Sort feature
Implementation
The sorting mechanism is facilitated by SortCommandParser. It implements the following operations:
-
SortCommandParser#parse()— Parses the input arguments by storing the prefixes of its respective values as anArgumentMultimap, and creates a newSortCommandobject with the parsed field and order.
The SortCommand object then communicates with the Model API by calling the following methods:
-
Model#updateSortedEmployeeList(field, order)— CallssortEmployeesmethod ofAddressBookclass. -
AddressBook#sortEmployees(field, order)— CallssortEmployeesmethod ofUniqueEmployeeListclass. -
UniqueEmployeeList#sortEmployees(field, order)— Sorts the internal list according to the field and order given.
The following sequence diagram below shows how the sort operation works:
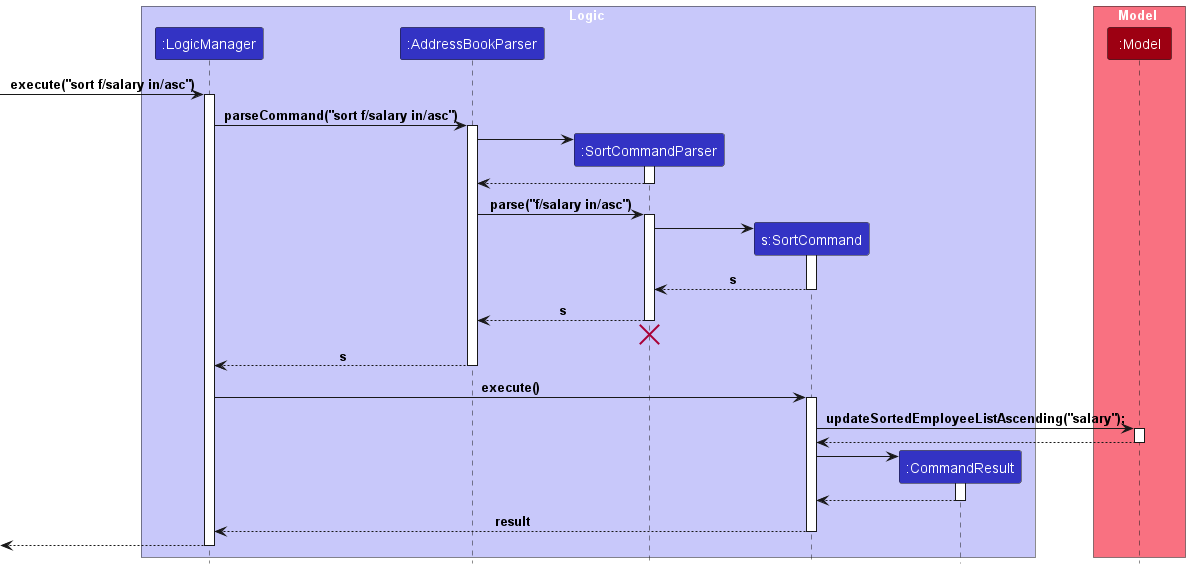
Given below is an example usage scenario for the command:
Step 1: The user launches the application.
Step 2: The user executes the sort f/FIELD in/ORDER command in the CLI
(note that only name, salary, overtime and leaves fields, as well as asc and desc orders are valid).
Step 3: The list of all employees in the employee book will be sorted accordingly.
The following activity diagram summarizes what happens when a user executes the sort command:
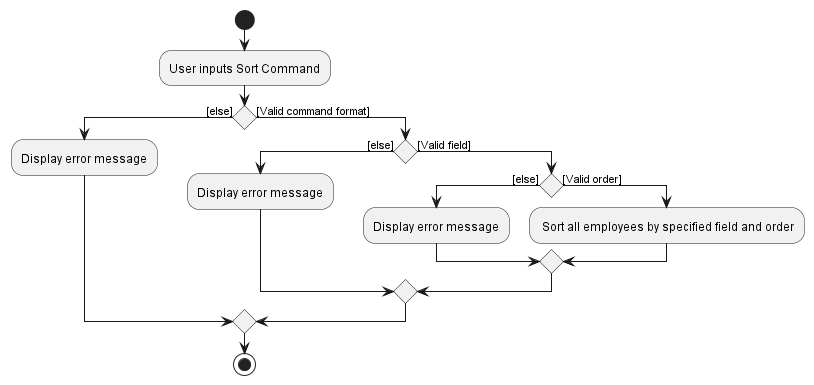
Design considerations:
Aspect: How sort executes:
-
Alternative 1 (current choice): Sorts the internal list directly
- Pros: Easy to implement.
- Cons: Disable the ability to list by order of employee added.
-
Alternative 2: Performs a sort on a copied list in
ModelManager.- Pros: Allows the
listcommand to list all employees by the order they were added. - Cons: Different lists in the
ModelManagerclass may cause inconsistencies whenfindandsortcommands are called consecutively.
- Pros: Allows the
Add Leave feature
The add leave feature allows HouR to manage employee leaves.
Implementation
The add leave command mechanism is facilitated by the AddLeaveCommandParser class which extends the AddressbookParser.
AddLeaveCommandParser#parse() overrides Parser#parse() in the Parser interface.
AddLeaveCommandParser implements the following operations:
-
AddLeaveCommandParser#parse()— Parses the input arguments by storing the prefixes of its respective values as anArgumentMultimap, and creates a newAddLeaveCommandobject with the parsed employee ID, start date and end date.
The AddLeaveCommand object then communicates with the Model API by calling the following methods:
-
Model#setEmployee(Employee, Employee)— Sets the employee in the existing employee list to the newEmployeeobject which has been edited byAddLeaveCommand#execute(). -
Model#updateFilteredEmployeeList(Predicate)— Updates the view of the application to show all employees.
The method AddLeaveCommand#execute() returns a CommandResult object, which stores information about the completion of the command.
The diagram below details how the operation of adding leave date(s) works.
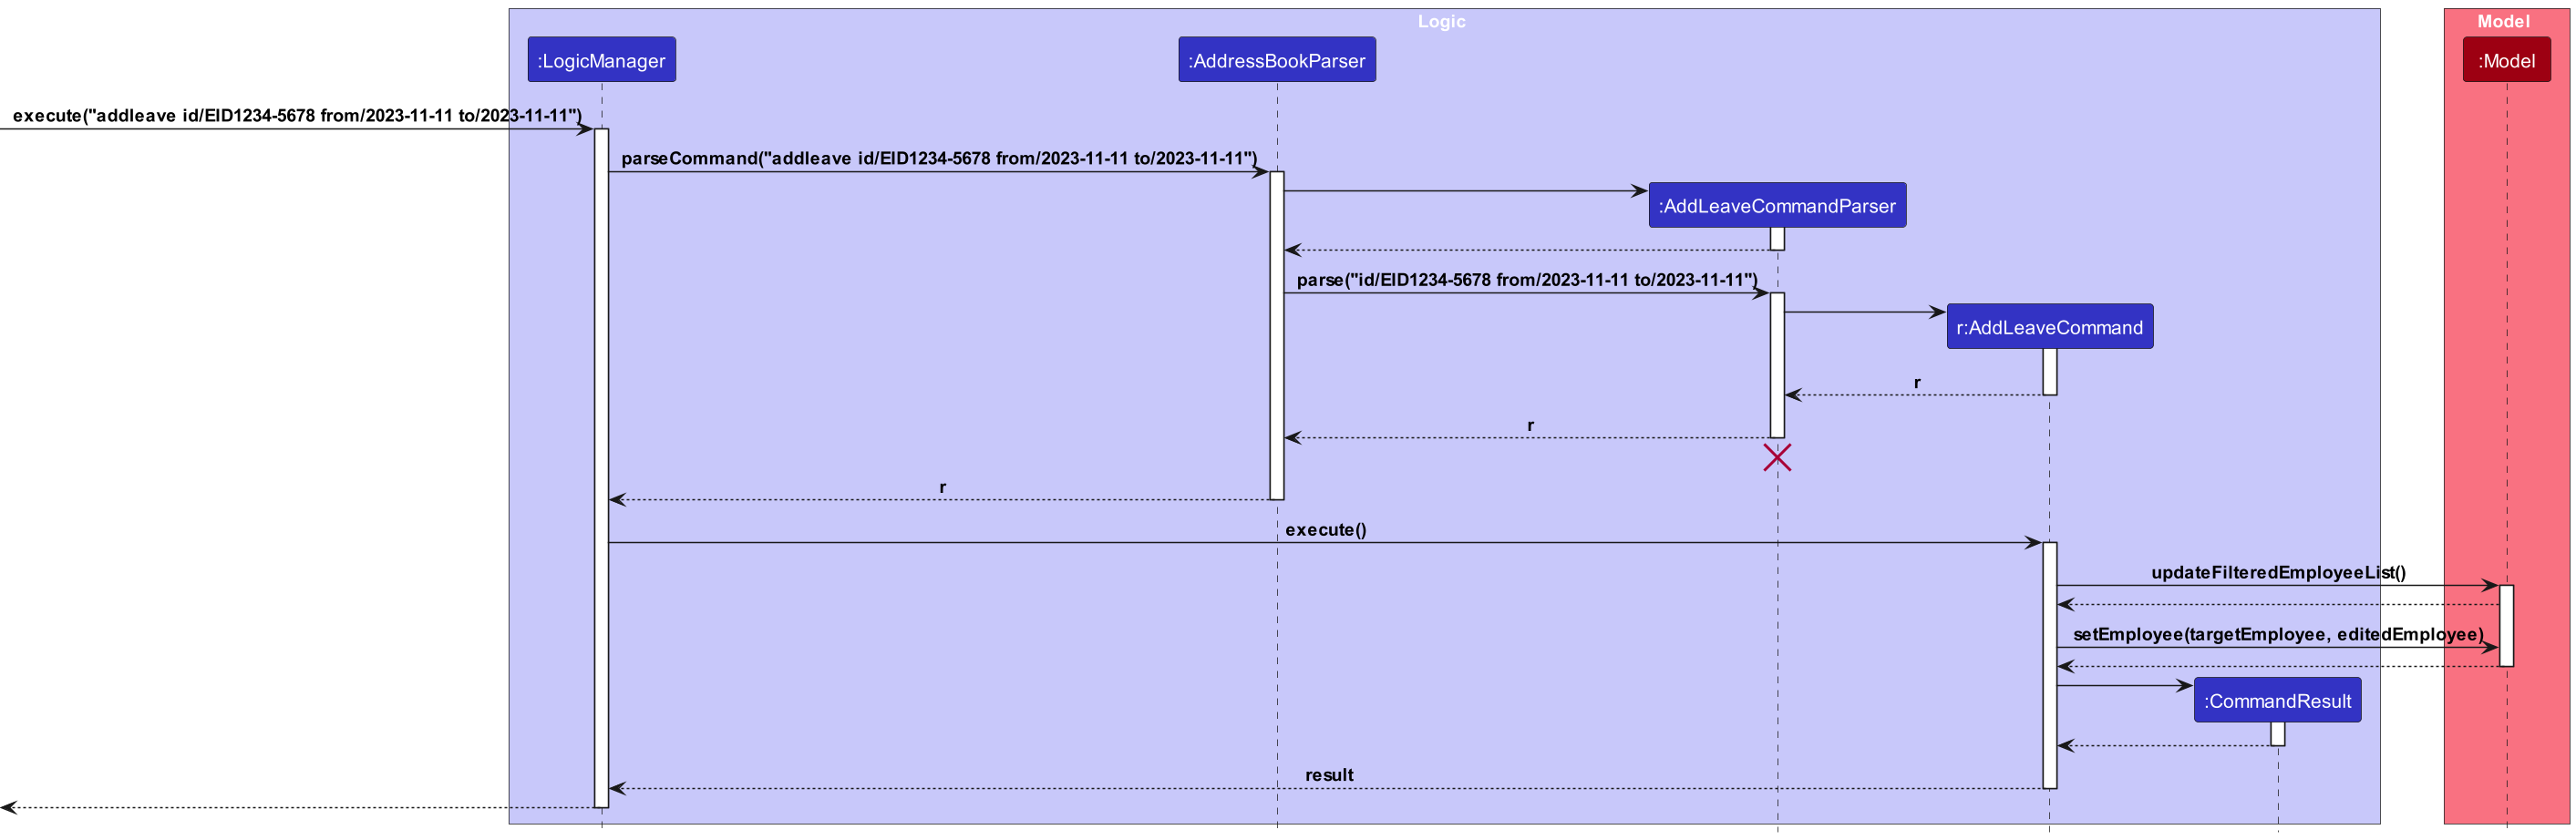
Given below is an example usage scenario for the command.
Step 1: The user launches the application.
Step 2: The user executes the addleave id/EMPLOYEE_ID from/START_DATE to/END_DATE command in the CLI.
-
START_DATEandEND_DATEare inputs of formatyyyy-MM-dd.
Step 3: A leave period will be assigned to the employee specified with the employee ID input.
- The leave period is added as a list of
Leavedates in the Employee’sleaveList.
Design considerations:
Aspect: Model-Employee Interaction:
-
Alternative 1 (current choice): Utilise
model#setEmployeeto add the edited employee into the model, doing the direct editing in AddLeaveCommand#execute().- Pros: Maintain immutability within Employee and Model classes.
- Cons: Potentially violates the Single Responsibility Principle.
-
Alternative 2: Create methods in model specifically to edit the
leaveListattribute of the employee.- Pros: More OOP, follows the Single Responsibility Principle by not having
AddLeaveCommand#execute()perform the editing directly. - Cons: Longer command execution, requires more parts to work together.
- Pros: More OOP, follows the Single Responsibility Principle by not having
Delete Leave feature
The delete leave feature allows HouR to delete employee leaves.
Implementation
The delete leave command mechanism is facilitated by DeleteLeaveCommandParser. It implements the following operations:
The delete leave command mechanism is facilitated by the DeleteLeaveCommandParser class which extends the AddressbookParser.
DeleteLeaveCommandParser#parse() overrides Parser#parse() in the Parser interface.
DeleteLeaveCommandParser implements the following operations:
-
DeleteLeaveCommandParser#parse()— Parses the input arguments by storing the prefixes of its respective values as anArgumentMultimap, and creates a newDeleteLeaveCommandobject with the parsed employee ID, start date and end date.
The DeleteLeaveCommand object then communicates with the Model API by calling the following methods:
-
Model#setEmployee(Employee, Employee)— Sets the employee in the existing employee list to the newEmployeeobject which has been edited byDeleteLeaveCommand#execute(). -
Model#updateFilteredEmployeeList(Predicate)— Updates the view of the application to show all employees.
The method DeleteLeaveCommand#execute() returns a CommandResult object, which stores information about the completion of the command.
The following sequence diagram below shows how the operation of deleting a leave appointment works:

Given below is an example usage scenario for the command:
Step 1: The user launches the application.
Step 2: The user executes the deleteleave id/EMPLOYEE_ID from/START_DATE to/END_DATE command in the CLI.
-
START_DATEandEND_DATEare inputs of formatyyyy-MM-dd.
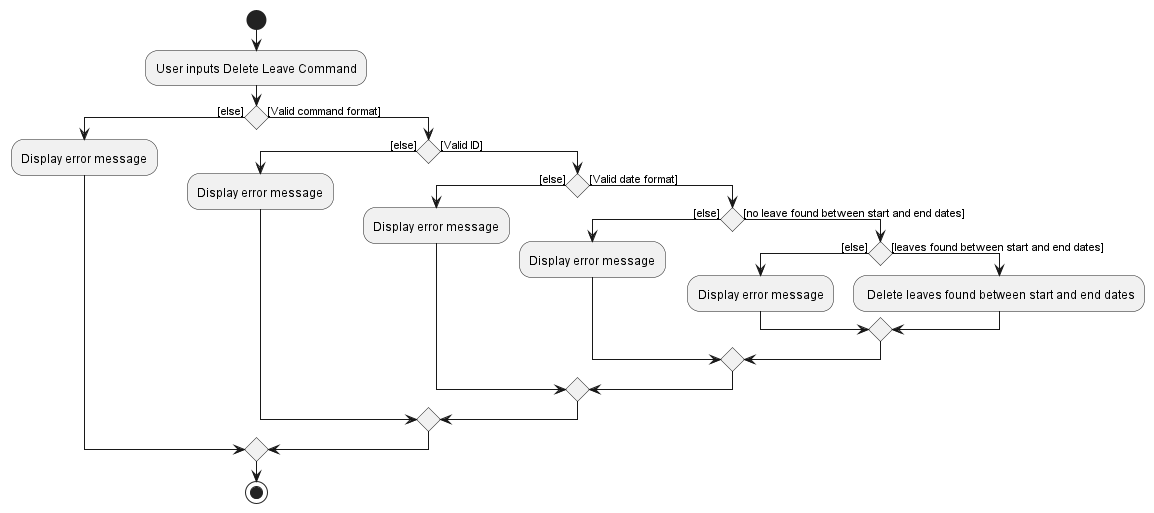
Step 3: Leave appointments that fall between the start and end dates will be deleted from the employee specified with the employee ID input.
- If no leave appointments exist between the start and end dates, an error will be produced and shown to the user.
The following activity diagram summarizes what happens when a user executes the delete leave command:
Design considerations:
Aspect: Model-Employee Interaction:
-
Alternative 1 (current choice): Utilise
model#setEmployeeto add the edited employee into the model, doing the direct editing in AddLeaveCommand#execute().- Pros: Maintain immutability within Employee and Model classes.
- Cons: Potentially violates the Single Responsibility Principle.
-
Alternative 2: Create methods in model specifically to edit the
leaveListattribute of the employee.- Pros: More OOP, follows the Single Responsibility Principle by not having
DeleteLeaveCommand#execute()perform the editing directly. - Cons: Longer command execution, requires more parts to work together, which can cause more bugs.
- Pros: More OOP, follows the Single Responsibility Principle by not having
Edit Leave feature
The edit leave feature allows HouR to edit employee leaves.
Implementation
The edit leave command mechanism is facilitated by EditLeaveCommandParser class which implements the Parser interface.
EditLeaveCommandParser#parse() is exposed in the Parser interface as Parse#parse().
EditLeaveCommandParser implements the following operations:
-
EditLeaveCommandParser#parse()— Parses the input arguments by storing the index and the prefix of its respective values as anArgumentMultimap, and creates a newEditLeaveCommandobject with the parsed id, old and new leave dates.
The EditLeaveCommand object then communicates with the Model API by calling the following methods:
-
Model#setEmployee(Employee, Employee)— Sets the employee in the existing employee list to the newEmployeeobject which has been edited byEditLeaveCommand#execute(). -
Model#updateFilteredEmployeeList(Predicate)— Updates the view of the application to show all employees.
The method EditLeaveCommand#execute() returns a new CommandResult object, which stores information about the completion of the command.
The following sequence diagram below shows how the edit leave operation works:
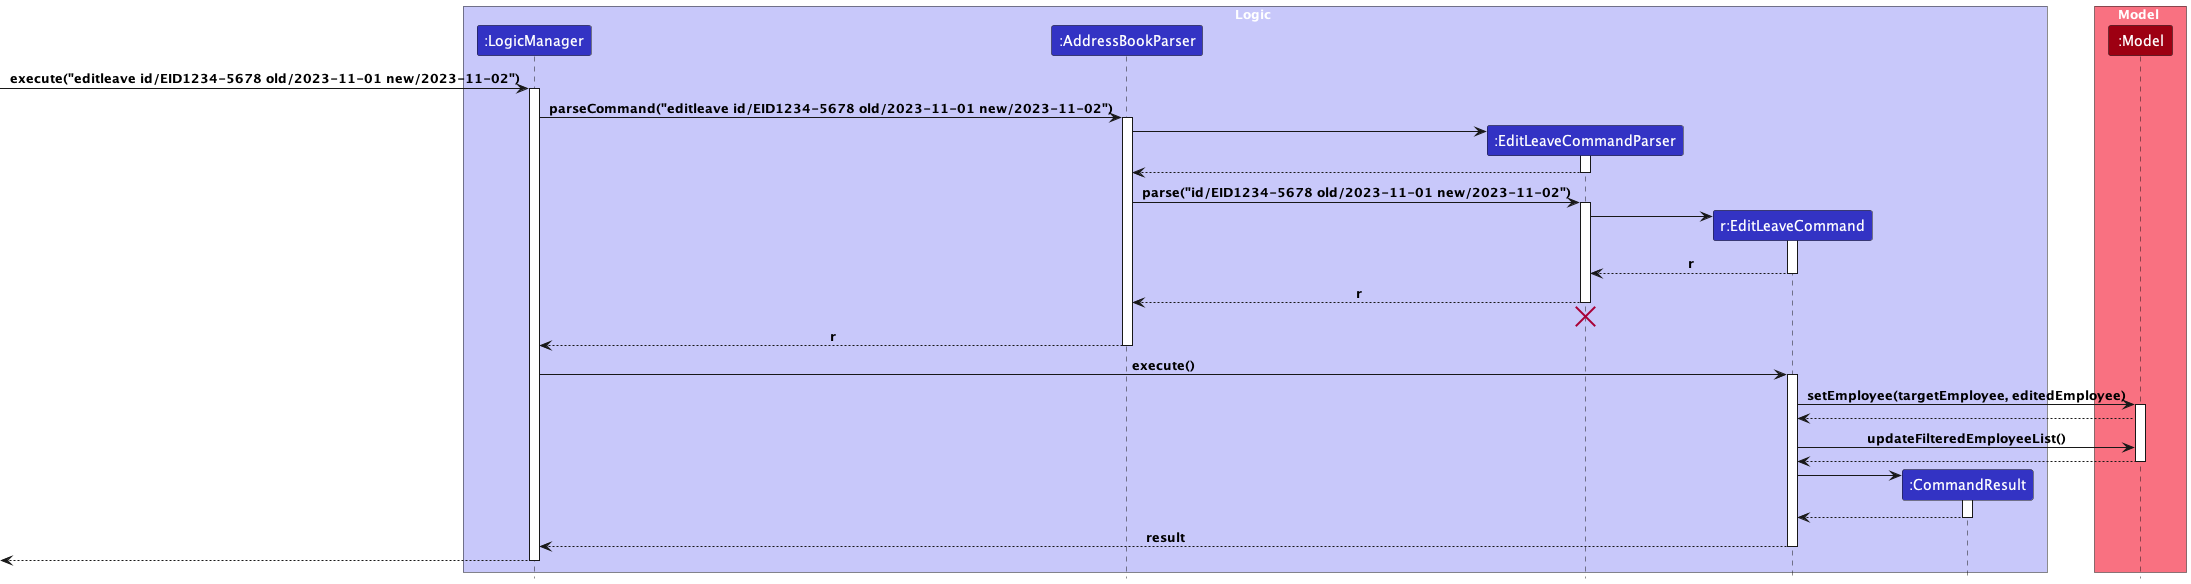
Given below is an example usage scenario for the command:
Step 1: The user launches the application.
Step 2: The user executes the editleave id/EMPLOYEE_ID old/OLD_DATE new/NEW_DATE command in the CLI.
Step 3: The given remark will be deleted from the remark list of the employee with the given id.
The following activity diagram summarizes what happens when a user executes the edit leave command:
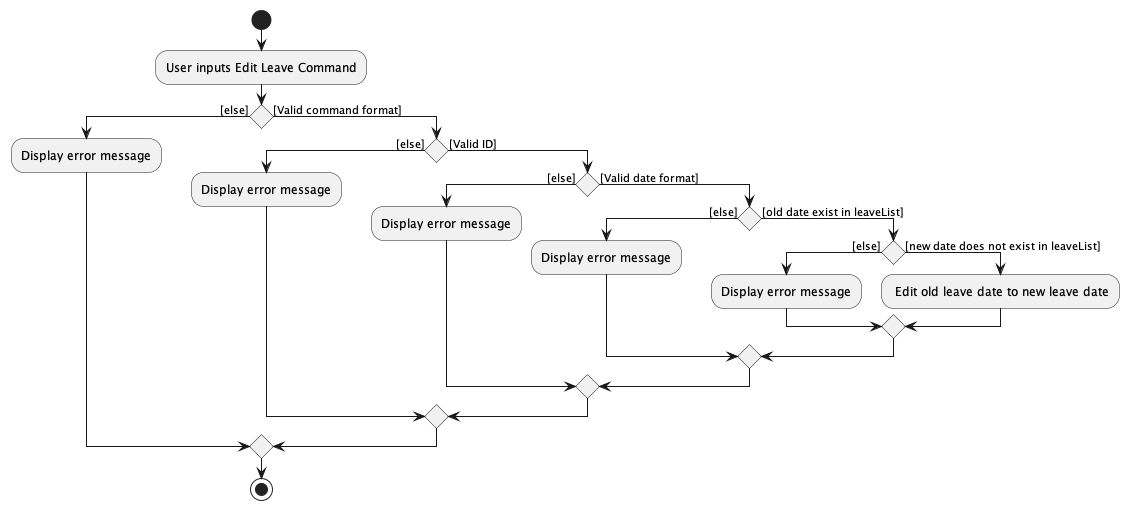
Design considerations:
Aspect: Model-Employee Interaction:
-
Alternative 1 (current choice): Utilise
model#setEmployeeto add the edited employee into the model, doing the direct editing inDeleteRemarkCommand#execute().- Pros: Maintain immutability within Employee and Model classes.
- Cons: Potentially violates SRP.
-
Alternative 2: Create methods in model specifically to edit the
remarkListattribute of the employee.- Pros: More OOP, follows SRP by not having
DeleteRemarkCommand#execute()perform the editing directly. - Cons: Longer command execution, requires more parts to work together.
- Pros: More OOP, follows SRP by not having
List Leave feature
The list leave feature allows HouR user to view employees on leave on the specified date.
Implementation
The list leave command mechanism is facilitated by the ListLeaveCommandParser class which extends the AddressbookParser.
ListLeaveCommandParser#parse() overrides Parser#parse() in the Parser interface.
ListLeaveCommandParser implements the following operations:
-
ListLeaveCommandParser#parse()— Parses the input arguments by storing the prefixes of its respective values as anArgumentMultimap, and creates a newListLeaveCommandobject with the parsed employee ID, start date and end date.
The ListLeaveCommand object then communicates with the Model API by calling the following methods:
-
Model#updateFilteredEmployeeList(Predicate)— Updates the view of the application to show all employees.
The method ListLeaveCommand#execute() returns a CommandResult object, which stores information about the completion of the command.
The diagram below details how the operation of listing employees on leave on the specified date works.
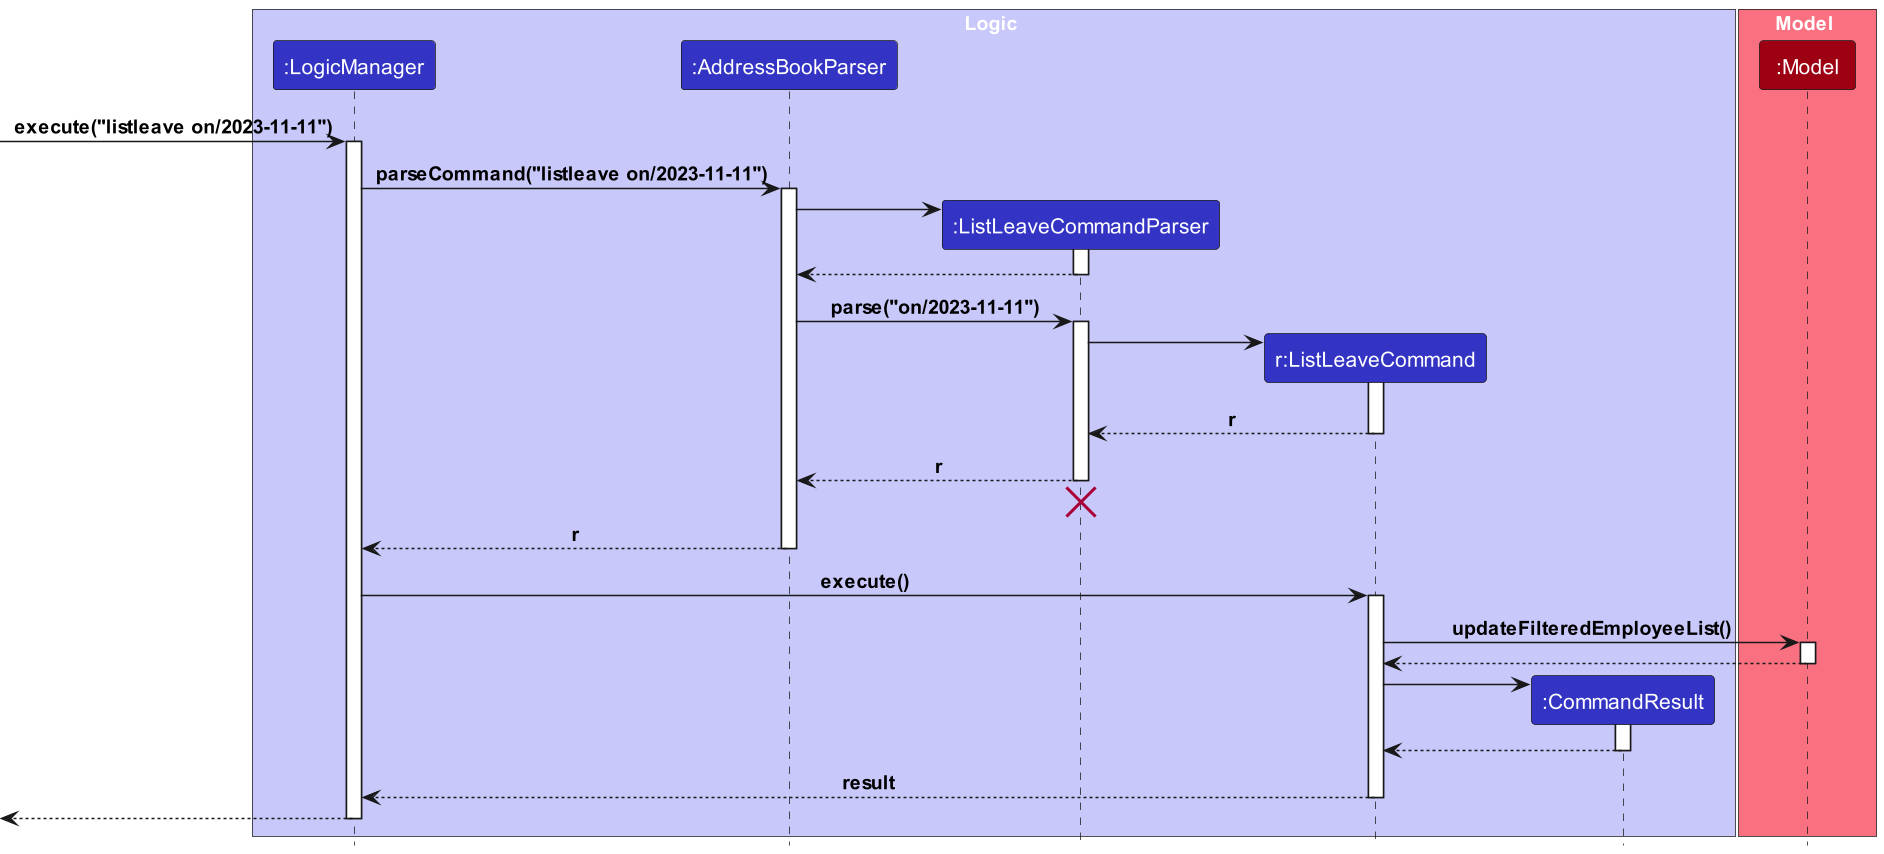
Given below is an example usage scenario for the command.
Step 1: The user launches the application.
Step 2: The user executes the listleave on/DATE command in the CLI.
-
DATEis an input of formatyyyy-MM-dd.
Step 3: Employees will be filtered based on whether they are on leave on the specified date.
- The Employee List will be updated to contain only employees which have leaves taken on the specified date.
Add Remark feature
The add remark feature allows HouR to add employee remarks.
Implementation
The add remark command mechanism is facilitated by AddRemarkCommandParser class which implements the Parser interface.
AddRemarkCommandParser#parse() is exposed in the Parser interface as Parse#parse().
AddRemarkCommandParser implements the following operations:
-
AddRemarkCommandParser#parse()— Parses the input arguments by storing the index and the prefix of its respective values as anArgumentMultimap, and creates a newAddRemarkCommandobject with the parsed ID and remark.
The AddRemarkCommand object then communicates with the Model API by calling the following methods:
-
Model#setEmployee(Employee, Employee)— Sets the employee in the existing employee list to the newEmployeeobject which has been edited byAddRemarkCommand#execute(). -
Model#updateFilteredEmployeeList(Predicate)— Updates the view of the application to show all employees.
The method AddRemarkCommand#execute() returns a new CommandResult object, which stores information about the completion of the command.
The following sequence diagram below shows how the add remark operation works:
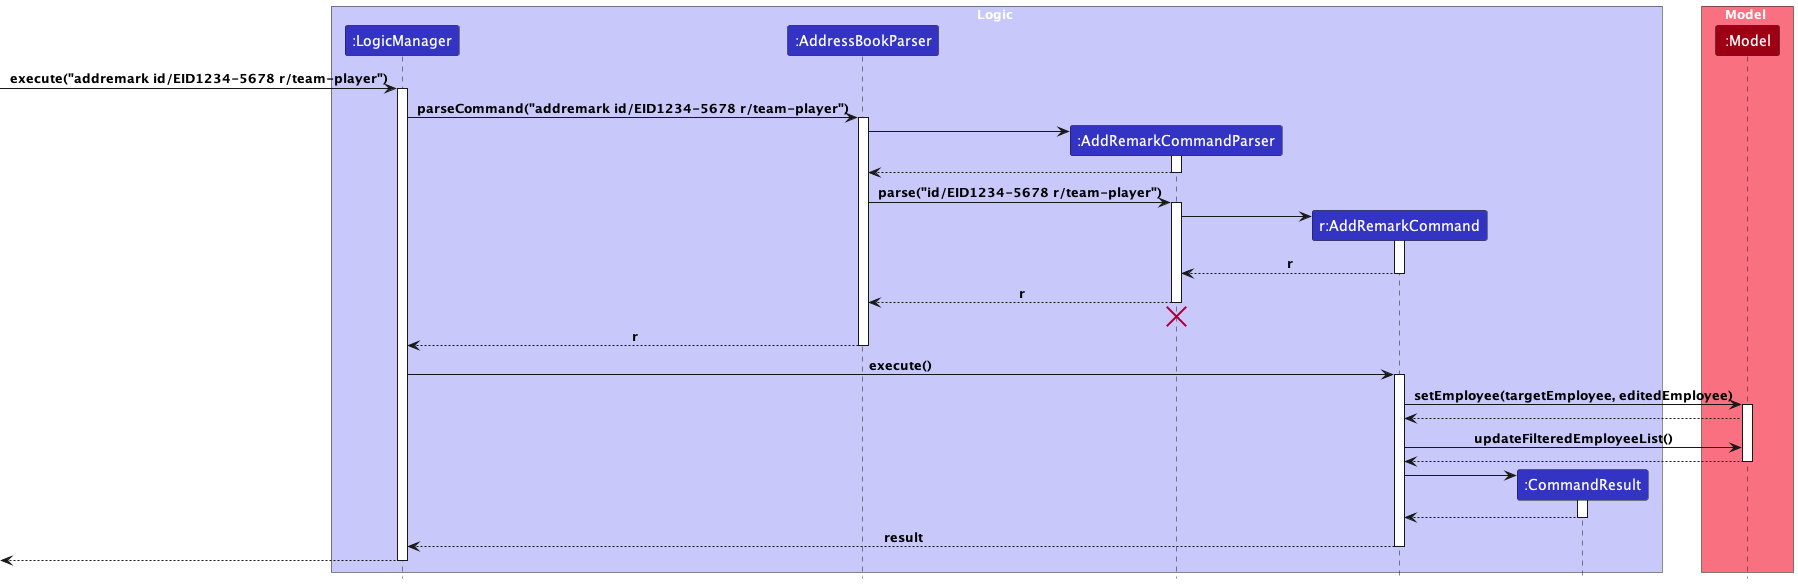
Given below is an example usage scenario for the command:
Step 1: The user launches the application.
Step 2: The user executes the addremark id/EMPLOYEE_ID r/REMARK command in the CLI.
Step 3: The given remark will be added to the remark list of the employee with the given ID.
Aspect: Model-Employee Interaction:
-
Alternative 1 (current choice): Utilise
model#setEmployeeto add the edited employee into the model, doing the direct editing inAddRemarkCommand#execute().- Pros: Maintain immutability within Employee and Model classes.
- Cons: Potentially violates SRP.
-
Alternative 2: Create methods in model specifically to edit the
remarkListattribute of the employee.- Pros: More OOP, follows SRP by not having
AddRemarkCommand#execute()perform the editing directly. - Cons: Longer command execution, requires more parts to work together.
- Pros: More OOP, follows SRP by not having
Delete Remark feature
The delete remark feature allows HouR to delete employee remarks.
Implementation
The delete remark command mechanism is facilitated by DeleteRemarkCommandParser class which implements the Parser interface.
DeleteRemarkCommandParser#parse() is exposed in the Parser interface as Parse#parse().
DeleteRemarkCommandParser implements the following operations:
-
DeleteRemarkCommandParser#parse()— Parses the input arguments by storing the index and the prefix of its respective values as anArgumentMultimap, and creates a newDeleteRemarkCommandobject with the parsed ID and remark.
The DeleteRemarkCommand object then communicates with the Model API by calling the following methods:
-
Model#setEmployee(Employee, Employee)— Sets the employee in the existing employee list to the newEmployeeobject which has been edited byDeleteRemarkCommand#execute(). -
Model#updateFilteredEmployeeList(Predicate)— Updates the view of the application to show all employees.
The method DeleteRemarkCommand#execute() returns a new CommandResult object, which stores information about the completion of the command.
The following sequence diagram below shows how the delete remark operation works:
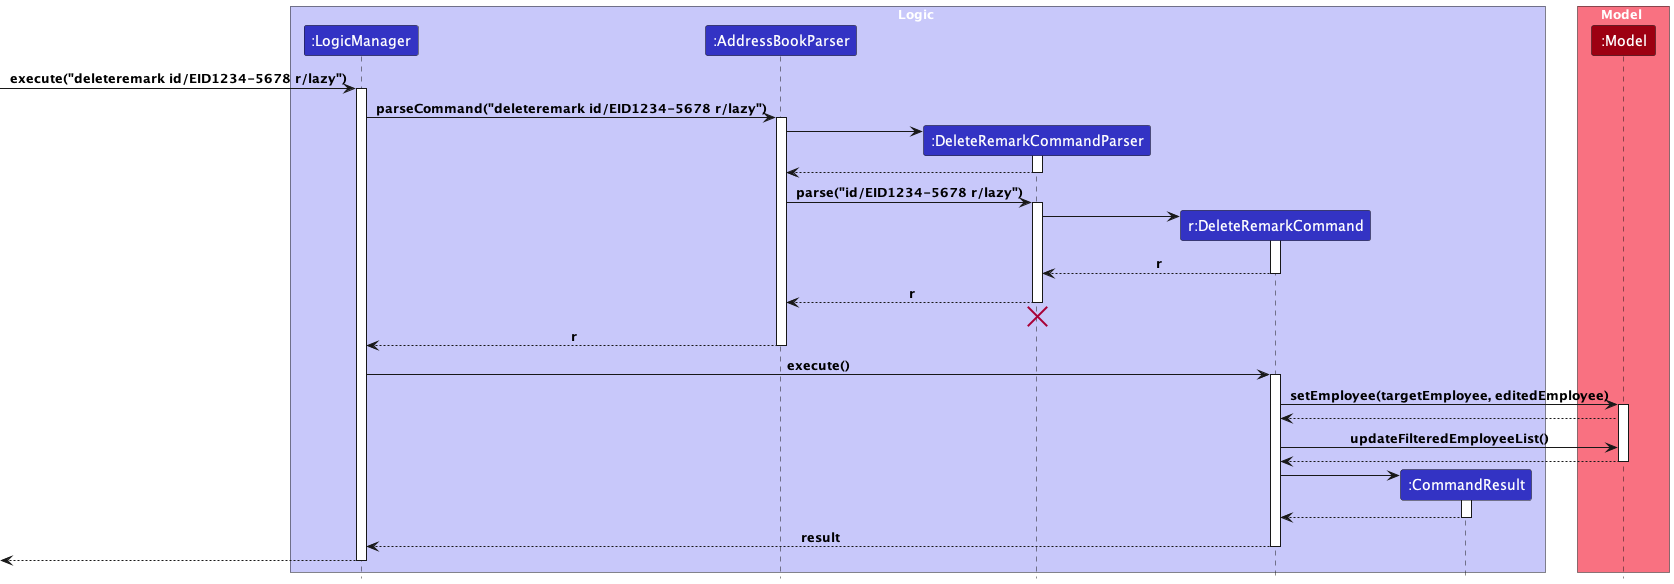
Given below is an example usage scenario for the command:
Step 1: The user launches the application.
Step 2: The user executes the deleteremark id/EMPLOYEE_ID r/REMARK command in the CLI.
Step 3: The given remark will be deleted from the remark list of the employee with the given ID.
Aspect: Model-Employee Interaction:
-
Alternative 1 (current choice): Utilise
model#setEmployeeto add the edited employee into the model, doing the direct editing inDeleteRemarkCommand#execute().- Pros: Maintain immutability within Employee and Model classes.
- Cons: Potentially violates SRP.
-
Alternative 2: Create methods in model specifically to edit the
remarkListattribute of the employee.- Pros: More OOP, follows SRP by not having
DeleteRemarkCommand#execute()perform the editing directly. - Cons: Longer command execution, requires more parts to work together.
- Pros: More OOP, follows SRP by not having
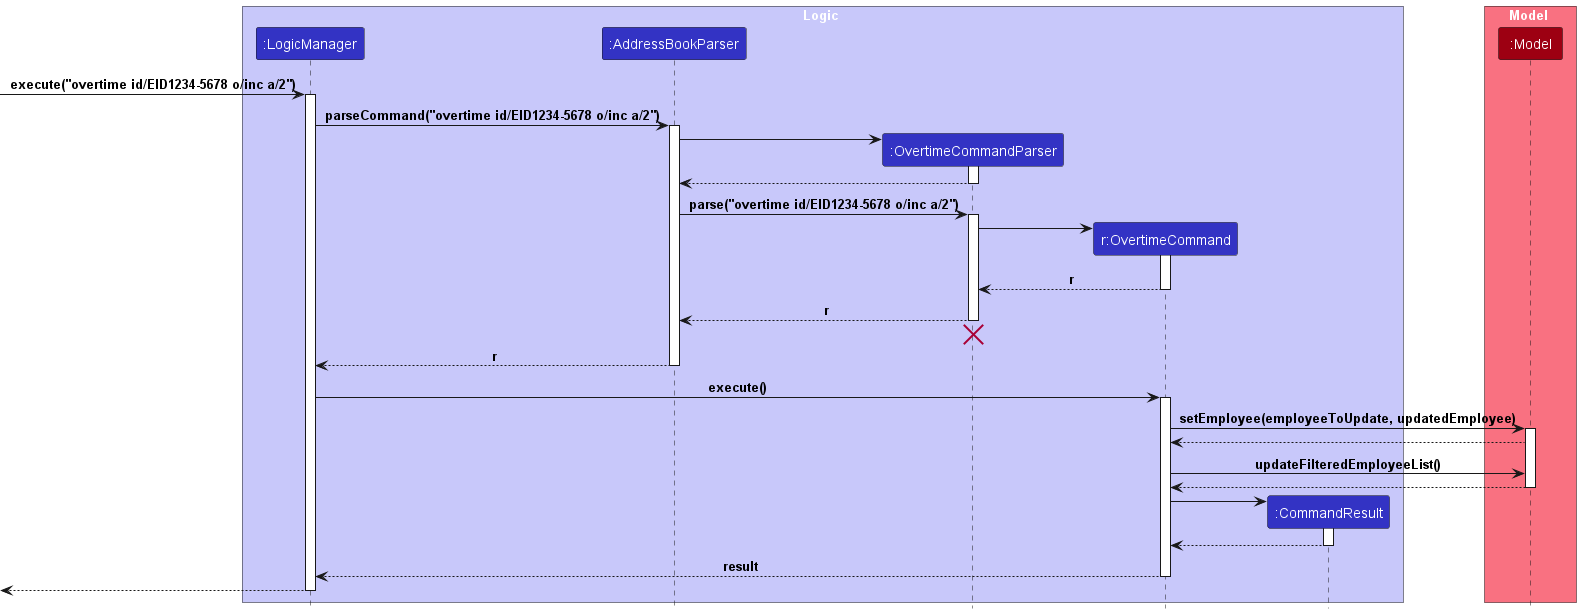
Overtime feature
The overtime feature allows HouR users to manage employee overtime hours.
Implementation
The overtime command mechanism is facilitated by OvertimeCommandParser class which implements the Parser interface.
OvertimeCommandParser#parse() is exposed in the Parser interface as Parse#parse().
OvertimeCommandParser implements the following operations:
-
OvertimeCommandParser#parse()— Parses the input arguments by storing the index and the prefix of its respective values as anArgumentMultimap, and creates a newOvertimeCommandobject with the parsed id and overtime hours.
The OvertimeCommand object then communicates with the Model API by calling the following methods:
-
Model#setEmployee(Employee, Employee)— Sets the employee in the existing employee list to the newEmployeeobject which has been edited byOvertimeCommand#execute().
The method OvertimeCommand#execute() returns a new CommandResult object, which stores information about the
completion of the command.
The following sequence diagram below shows how the overtime operation works:
Given below is an example usage scenario for the command:
Step 1: The user launches the application.
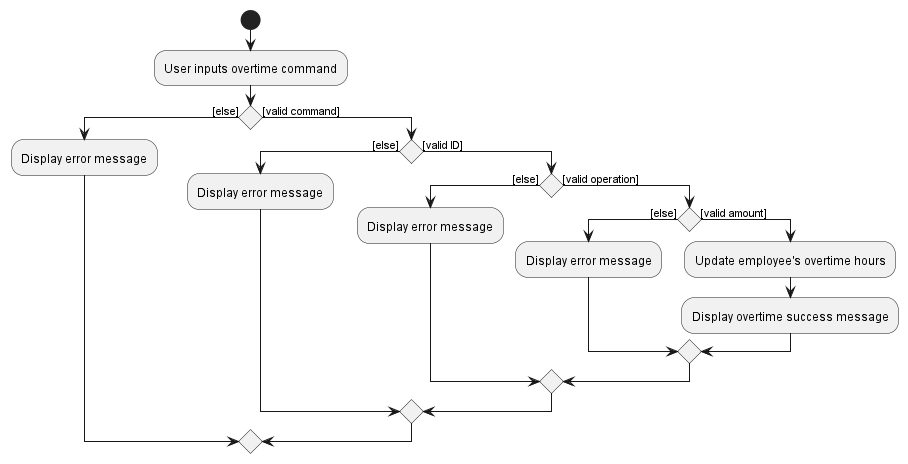
Step 2: The user executes the overtime id/EMPLOYEE_ID o/OPERATION a/AMOUNT command in the CLI.
-
OPERATIONis eitherincordec. - Step 3: The given overtime hours will be added to the employee with the provided ID.
Aspect: Model-Employee Interaction:
-
Alternative 1 (current choice): Utilise
model#setEmployeeto add the edited employee into the model, doing the direct editing inOvertimeCommand#execute().- Pros: More code reuse. Maintain immutability within Employee and Model classes.
- Cons: Potentially violates SRP.
-
Alternative 2: Create methods in model specifically to edit the
overtimeHoursattribute of the employee.- Pros: More OOP, follows SRP by not having
OvertimeCommand#execute()perform the editing directly. - Cons: More code duplication. Longer command execution, requires more parts to work together.
- Pros: More OOP, follows SRP by not having
The following activity diagram summarizes what happens when a user executes the overtime command:
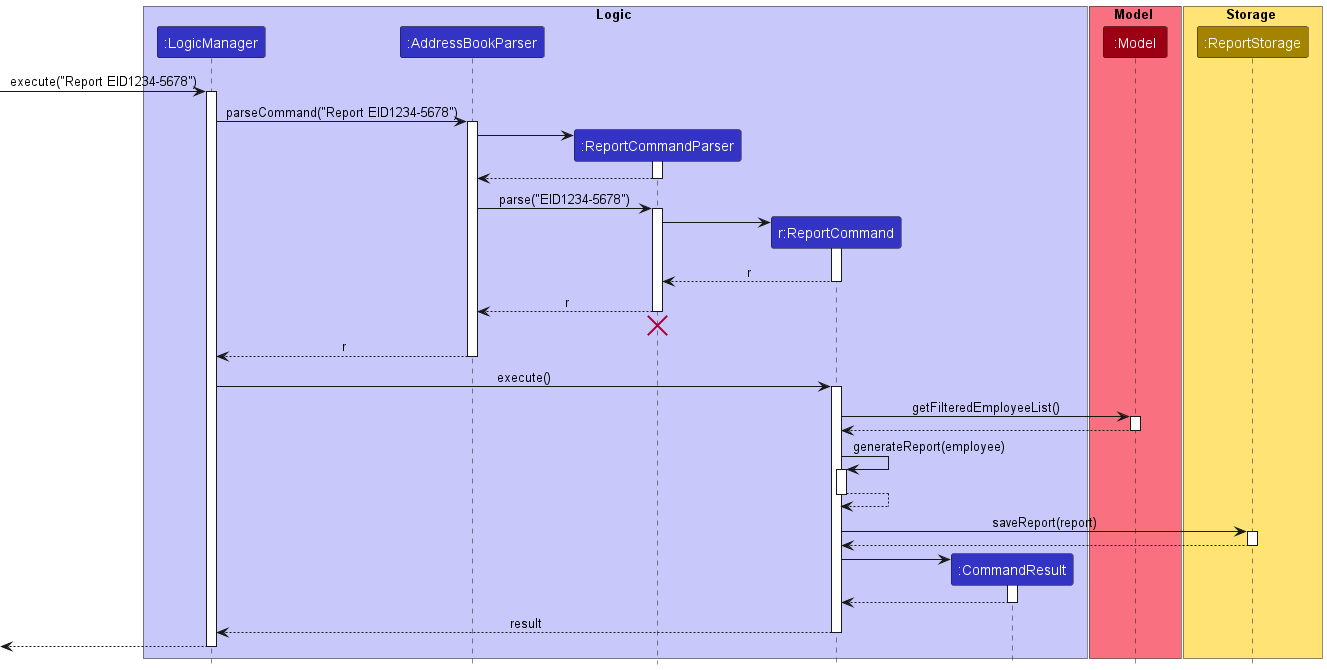
Report feature
Implementation
The proposed reporting mechanism is facilitated by ReportCommandParser. It implements the following operations:
-
ReportCommandParser#parse()— Parses the input employee ID and creates a newReportCommandobject with the parsed employee ID.
The ReportCommand object then communicates with the Model and ReportStorage APIs by calling the following methods:
-
Model#getFilteredEmployeeList()— Gets the existing employee list, which is then looped through to get the employee with the given employee ID. -
ReportStorage#saveReport(Report)— Saves the report generated inReportCommand#execute()byReportCommand#generateReport(employee), which is then stored on the hard disk as a.txtfile.
The method ReportCommand#execute() returns a CommandResult object, which stores information about the completion of the command.
The following sequence diagram below shows how the report operation works:
Given below is an example usage scenario for the command:
Step 1: The user launches the application.
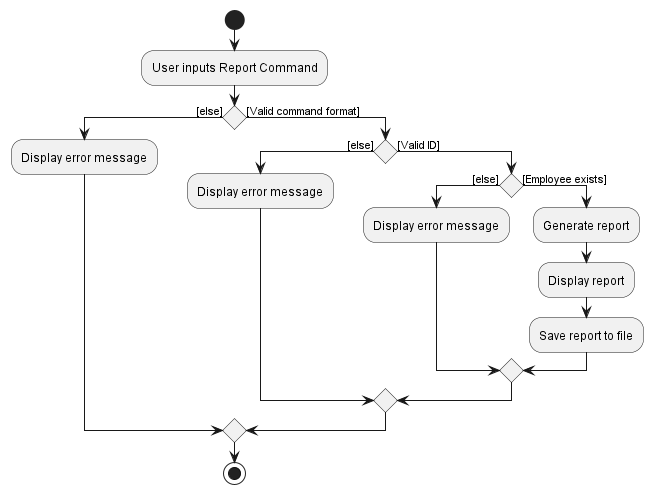
Step 2: The user executes the report EMPLOYEE_ID command in the CLI.
Step 3: A report will be generated for the employee with the given ID.
The following activity diagram summarises what happens when a user executes the report command:
Design considerations:
Aspect: Command-Model Interaction
-
Alternative 1 (current choice): Utilise
Model#getFilteredEmployeeList()to get the existing employee list, which is then looped through to get the employee with the given employee ID.- Pros: Maintain immutability within Employee and Model classes.
- Cons: Longer command execution, requiring more parts to work together.
-
Alternative 2: Create methods in
Modelclass specifically to get the employee with the given employee ID.- Pros: Shorter command execution.
- Cons: May reduce immutability between Employee and Model classes.
Aspect: Command-Storage Interaction
-
Alternative 1 (current choice): Utilise a dedicated storage class
ReportStoragewith the methodReportStorage#saveReport(Report)to save the report.- Pros: Maintain SRP and SLAP within the command class.
- Cons: Longer command execution, requiring more parts to work together.
-
Alternative 2: Create methods in
ReportCommandclass to write and save the report.- Pros: Shorter command execution, one less point of failure by eliminating the
ReportStorageclass. - Cons: Less OOP, may violate SLAP within the command class.
- Pros: Shorter command execution, one less point of failure by eliminating the
Reset feature
The reset feature allows HouR to reset employee overtime hours and leaves.
Implementation
The reset command mechanism is facilitated by ResetCommandParser class which implements the Parser interface.
ResetCommandParser#parse() is exposed in the Parser interface as Parse#parse().
ResetCommandParser implements the following operations:
-
ResetCommandParser#parse()— Parses the input arguments by storing the index and the prefix of its respective values as anArgumentMultimap, and creates a newResetCommandobject with the parsed field.
The ResetCommand object then communicates with the Model API by calling the following methods:
-
Model#setEmployee(Employee, Employee)— Sets the employee in the existing employee list to the newEmployeeobject which has been edited byResetCommand#execute(). -
Model#updateFilteredEmployeeList(Predicate)— Updates the view of the application to show all employees.
The method ResetCommand#execute() returns a new CommandResult object, which stores information about the completion of the command.
The following sequence diagram below shows how the reset operation works:
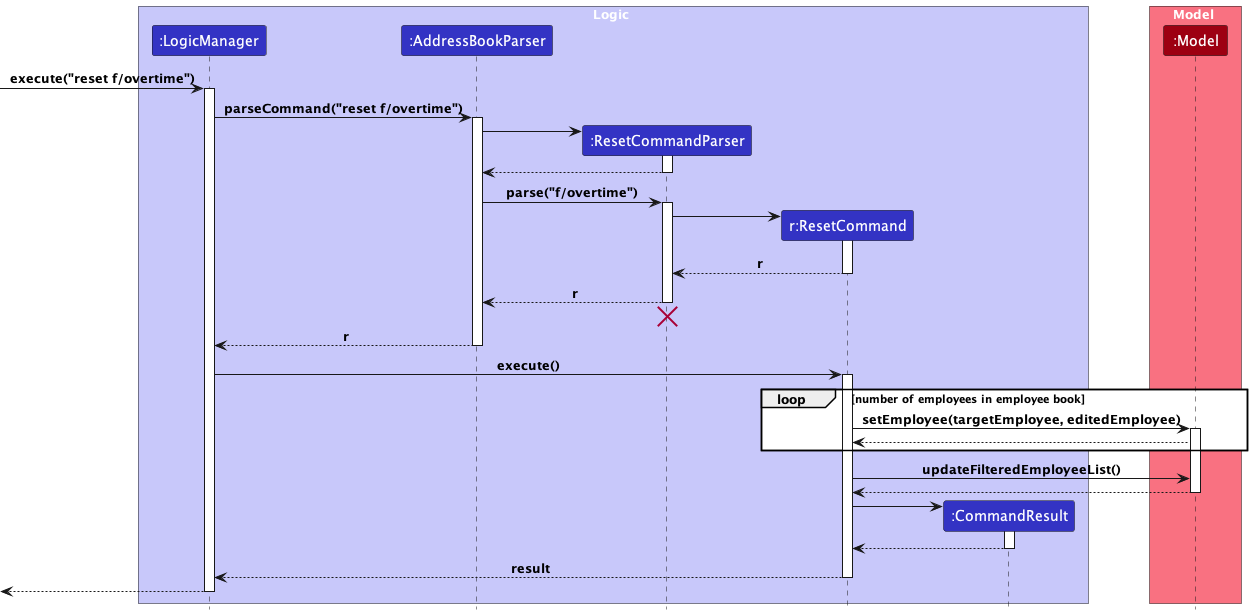
Given below is an example usage scenario for the command:
Step 1: The user launches the application.
Step 2: The user executes the reset f/FIELD command in the CLI (note that only overtime and leaves are valid).
Step 3: The given field of all employees in the employee book will be reset to their default value.
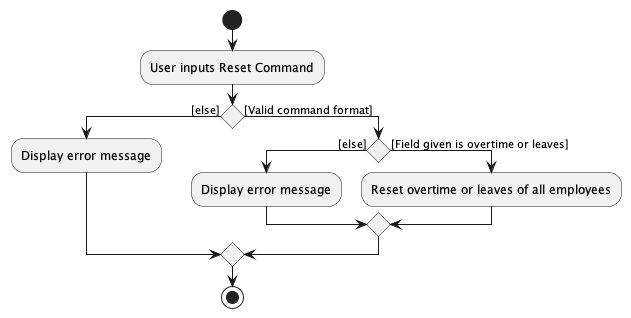
The following activity diagram summarizes what happens when a user executes the reset command:
Design considerations:
Aspect: Model-Employee Interaction:
-
Alternative 1 (current choice): Utilise
Model#setEmployeeto add the edited employee into the model, doing the direct editing inResetCommand#execute().- Pros: Maintain immutability within Employee and Model classes.
- Cons: Potentially violates SRP.
-
Alternative 2: Create methods in
Modelclass specifically to edit the fields of the employees.- Pros: More OOP, follows SRP by not having
ResetCommand#execute()perform the editing directly. - Cons: Longer command execution, requiring more parts to work together.
- Pros: More OOP, follows SRP by not having
[Proposed] Undo/redo feature
Proposed Implementation
The proposed undo/redo mechanism is facilitated by VersionedAddressBook. It extends AddressBook with an undo/redo history, stored internally as an addressBookStateList and currentStatePointer. Additionally, it implements the following operations:
-
VersionedAddressBook#commit()— Saves the current address book state in its history. -
VersionedAddressBook#undo()— Restores the previous address book state from its history. -
VersionedAddressBook#redo()— Restores a previously undone address book state from its history.
These operations are exposed in the Model interface as Model#commitAddressBook(), Model#undoAddressBook() and Model#redoAddressBook() respectively.
Given below is an example usage scenario and how the undo/redo mechanism behaves at each step.
Step 1. The user launches the application for the first time. The VersionedAddressBook will be initialized with the initial address book state, and the currentStatePointer pointing to that single address book state.
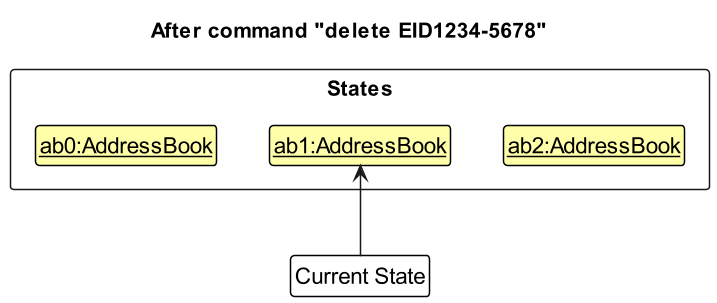
Step 2. The user executes delete EID1234-5678 command to delete an employee in the address book. The delete command calls Model#commitAddressBook(), causing the modified state of the address book after the delete EID1234-5678 command executes to be saved in the addressBookStateList, and the currentStatePointer is shifted to the newly inserted address book state.
Step 3. The user executes add n/David … to add a new employee. The add command also calls Model#commitAddressBook(), causing another modified address book state to be saved into the addressBookStateList.
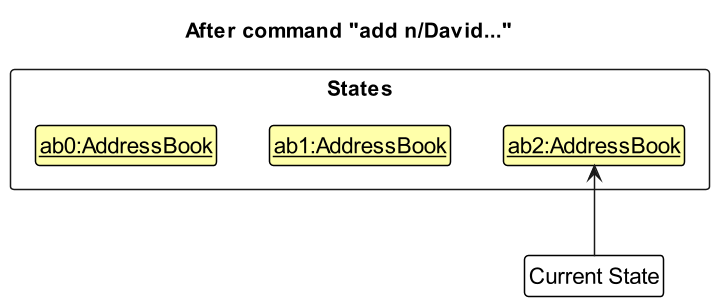
Model#commitAddressBook(), so the address book state will not be saved into the addressBookStateList.
Step 4. The user now decides that adding the employee was a mistake, and decides to undo that action by executing the undo command. The undo command will call Model#undoAddressBook(), which will shift the currentStatePointer once to the left, pointing it to the previous address book state, and restores the address book to that state.
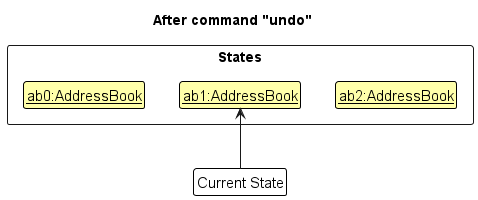
currentStatePointer is at index 0, pointing to the initial AddressBook state, then there are no previous AddressBook states to restore. The undo command uses Model#canUndoAddressBook() to check if this is the case. If so, it will return an error to the user rather
than attempting to perform the undo.
The following sequence diagram shows how the undo operation works:
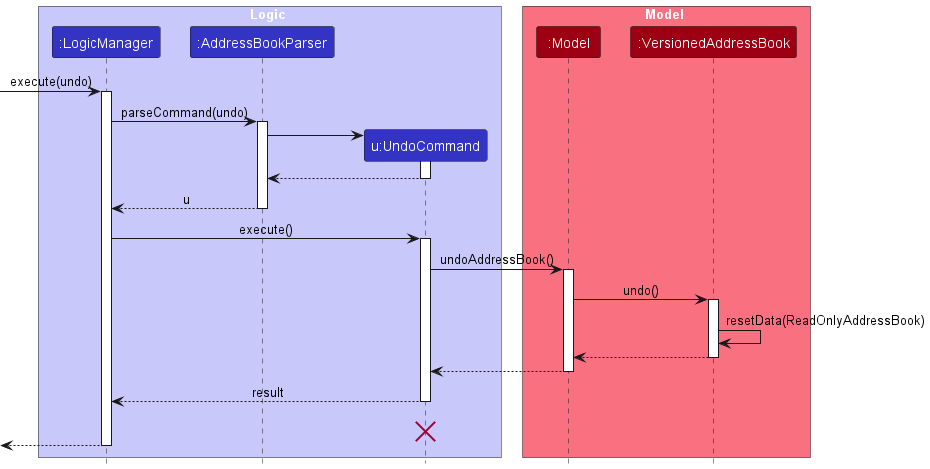
UndoCommand should end at the destroy marker (X) but due to a limitation of PlantUML, the lifeline reaches the end of diagram.
The redo command does the opposite — it calls Model#redoAddressBook(), which shifts the currentStatePointer once to the right, pointing to the previously undone state, and restores the address book to that state.
currentStatePointer is at index addressBookStateList.size() - 1, pointing to the latest address book state, then there are no undone AddressBook states to restore. The redo command uses Model#canRedoAddressBook() to check if this is the case. If so, it will return an error to the user rather than attempting to perform the redo.
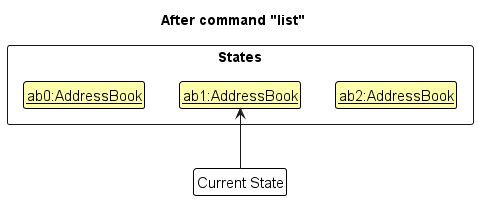
Step 5. The user then decides to execute the command list. Commands that do not modify the address book, such as list, will usually not call Model#commitAddressBook(), Model#undoAddressBook() or Model#redoAddressBook(). Thus, the addressBookStateList remains unchanged.
Step 6. The user executes clear, which calls Model#commitAddressBook(). Since the currentStatePointer is not pointing at the end of the addressBookStateList, all address book states after the currentStatePointer will be purged. Reason: It no longer makes sense to redo the add n/David … command. This is the behavior that most modern desktop applications follow.

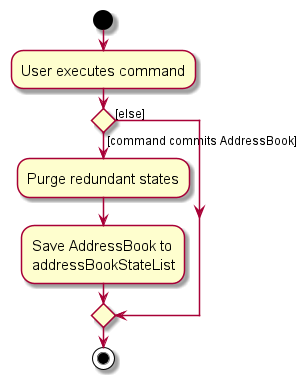
The following activity diagram summarizes what happens when a user executes a new command:
Design considerations:
Aspect: How undo & redo executes:
-
Alternative 1 (current choice): Saves the entire address book.
- Pros: Easy to implement.
- Cons: May have performance issues in terms of memory usage.
-
Alternative 2: Individual command knows how to undo/redo by
itself.
- Pros: Will use less memory (e.g. for
delete, just save the employee being deleted). -
Cons: We must ensure that the implementation of each individual command are correct.
- Pros: Will use less memory (e.g. for
Documentation, logging, testing, configuration, dev-ops
Appendix: Requirements
Product scope
HouR is a desktop app for human resources staff managing employee data, including performance metrics, optimised for use via a Command Line Interface (CLI) while still having the benefits of a Graphical User Interface (GUI). If you can type fast, HouR can get your employee management tasks done faster than traditional GUI apps.
Target user profile:
- has a need to manage a significant number of employee records
- prefer desktop apps over other types
- can type fast
- prefers typing to mouse interactions
- is reasonably comfortable using CLI apps
Value proposition: manage contacts faster than a typical mouse/GUI driven app
User stories
Priorities: High (must have) - * * *, Medium (nice to have) - * *, Low (unlikely to have) - *
| Priority | As a … | I want to … | So that I can… |
|---|---|---|---|
* * * |
new user | add/delete dummy data | familiarise myself with the commands available |
* * * |
beginner user | delete existing employee record | remove ex-employees from database |
* * * |
beginner user | see the list of all employee data | easily view all the employee data in one place |
* * * |
beginner user | add new employees to the database | keep the records up-to-date |
* * * |
new user | see clear error messages when I enter incorrect or incomplete information | correct mistakes efficiently |
* * |
beginner user | assign departments to employees | organise them according to different departments |
* * |
new user | access a user guide | know how to set up and launch the application |
* * |
new user | purge all current data | get rid of sample/experimental data I used for exploring the app |
* * |
intermediate user | modify existing records | update employees’ information and categories |
* * |
intermediate user | filter and search certain employees based on criteria like department and salaries | look for the data I need |
* * |
intermediate user | sort the data / records by date and categories | view relevant data in a more organised manner |
* * |
intermediate user | allocate leaves for employees | keep track of the leave schedule of each employee |
* * |
intermediate user | check the leave status of employees | better plan my manpower and schedule work for each employee |
* * |
intermediate user | view employees who are on leave on certain dates | ensure that there is enough manpower every day |
* * |
intermediate user | generate individual employee reports | have an overview of the performance of each employee |
* * |
intermediate user | keep track of overtime hours of employees | keep track of employee productivity and compensate them fairly (overtime pay) |
* * |
intermediate user | reset specific fields of all employees | reset fields like overtime hours and leaves regularly (monthly/yearly) |
* * |
intermediate user | batch delete records | keep my database organised and clutter-free |
* * |
long-time user | private individuals’ personal details | minimise the chance of someone else seeing them by accident and violating PDPA |
* |
new user | access a quick tutorial or guided tour | learn how to use basic features of the application |
* |
forgetful beginner user | access a command summary | easily know which commands to use |
* |
intermediate user | create keyboard shortcuts for tasks | save time on frequently performed tasks |
* |
long-time user | conduct advanced searches with multiple criteria | gain deeper insights into employee performance |
* |
long-time user | access a knowledge base or community forum | share best practices and learn from other experienced users |
* |
long-time user | share / collaborate with other colleagues in my department | distribute work with my colleagues |
* |
long-time user | archive unused data | not distracted by irrelevant data |
Use cases
(For all use cases below, the System is the HouR and the Actor is the user, unless specified otherwise)
Use case: Add an employee
MSS
- User requests to add a specific employee
-
HouR adds the employee to the list of employees
Use case ends.
Extensions
- 1a. The employee to be added already exists in the list.
- 1a1. HouR shows an error message.
Use case ends.
Use case: Delete an employee
MSS
- User requests to list employees
- HouR shows a list of employees
- User requests to delete a specific employee in the list
-
HouR deletes the employee
Use case ends.
Extensions
-
2a. The list is empty.
Use case ends.
-
3a. The given employee ID is invalid.
-
3a1. HouR shows an error message.
Use case resumes at step 2.
-
Use case: Edit an employee
MSS
- User requests to list employees
- HouR shows a list of employees
- User requests to edit a specific employee in the list
-
HouR edits the employee
Use case ends.
Extensions
-
2a. The list is empty.
Use case ends.
-
3a. The given index is invalid.
-
3a1. HouR shows an error message.
Use case resumes at step 2.
-
-
3b. Missing field to edit.
-
3a1. HouR shows an error message.
Use case resumes at step 2.
-
Use case: List employees
MSS
- User requests to list employees
-
HouR display a list of every employee that has been added
Use case ends.
Use case: Find employees
MSS
- User requests to find employees with keyword
-
HouR returns list of employees with keyword
Use case ends.
Extensions
- 1a. User leaves out keyword.
- 1a1. HouR shows an error message.
Use case returns back to step 1.
- 1b. No employee matches given keyword.
- 1b1. HouR shows an empty list.
Use case ends.
Use case: Sort employees
MSS
- User requests to sort employees by given field and order.
-
HouR returns the sorted list of employees based on given field in given order.
Use case ends.
Extensions
- 1a. User leaves out at least one of field or order.
- 1a1. HouR shows an error message.
Use case returns back to step 1.
- 1b. Field is not usable for sorting.
- 1b1. HouR shows an error message.
Use case returns back to step 1.
- 1c. Order is not asc or desc.
- 1c1. HouR shows an error message.
Use case returns back to step 1.
Use case: Add a leave period for an employee
MSS
- User requests to add a leave period for an employee with a given ID from given start date to given end date.
-
HouR adds the individual dates between the given start and end dates inclusive as leave dates for the employee with given ID.
Use case ends.
Extensions
- 1a. User leaves out at least one of employee ID, start date, or end date.
- 1a1. HouR shows an error message.
Use case returns back to step 1.
- 1b. No employee matches given ID.
- 1b1. HouR shows an error message.
Use case returns back to step 1.
- 1c. Dates are of invalid order or format.
- 1c1. HouR shows an error message.
Use case returns back to step 1.
- 1d. Leave date to be added already exists.
- 1d1. HouR shows an error message.
Use case returns back to step 1.
- 1e. Adding the leave date causes number of leaves
for employee with given employee ID to be over 14 days .
- 1e1. HouR shows an error message.
Use case returns back to step 1.
Use case: Delete a leave period for an employee
MSS
- User requests to delete allocated leaves for an employee with a given ID that falls between given start and end dates.
-
HouR deletes the allocated leave dates that fall between the given start and end dates inclusive for the employee with given ID.
Use case ends.
Extensions
- 1a. User leaves out at least one of employee ID, start date, or end date.
- 1a1. HouR shows an error message.
Use case returns back to step 1.
- 1b. No employee matches given ID.
- 1b1. HouR shows an error message.
Use case returns back to step 1.
- 1c. Dates are of invalid order or format.
- 1c1. HouR shows an error message.
Use case returns back to step 1.
- 1d. No allocated leaves found between given start and end dates.
- 1d1. HouR shows an error message.
Use case returns back to step 1.
Use case: Edit an allocated leave date for an employee
MSS
- User requests to edit a given allocated leave date for an employee with a given ID to the given new leave date.
-
HouR edits the given allocated leave date to the given new leave date for the employee with given ID.
Use case ends.
Extensions
- 1a. User leaves out at least one of employee ID, old leave date, or new leave date.
- 1a1. HouR shows an error message.
Use case returns back to step 1.
- 1b. No employee matches given ID.
- 1b1. HouR shows an error message.
Use case returns back to step 1.
- 1c. Dates are of invalid format.
- 1c1. HouR shows an error message.
Use case returns back to step 1.
- 1d. Given allocated date to be edited does not exist.
- 1d1. HouR shows an error message.
Use case returns back to step 1.
- 1e. Given new date is already allocated.
- 1e1. HouR shows an error message.
Use case returns back to step 1.
Use case: List employees on leave
MSS
- User requests to view a list of all employees on leave on a given date.
-
HouR filters the displayed employee list to only display employees on leave on the given date.
Use case ends.
Extensions
- 1a. User leaves out date.
- 1a1. HouR shows an error message.
Use case returns back to step 1.
- 1b. Dates are in the wrong format.
- 1b1. HouR shows an error message.
Use case returns back to step 1.
Use case: Add a remark for an employee
MSS
- User requests to add a given remark to an employee with a given employee ID.
-
HouR adds the remark to the list of remarks associated with the employee with the given employee ID and shows the list to the user.
Use case ends.
Extensions
- 1a. User leaves out at least one of employee ID or remark.
- 1a1. HouR shows an error message.
Use case returns back to step 1.
- 1b. No employee matches given employee ID.
- 1b1. HouR shows an error message.
Use case returns back to step 1.
- 1c. Remark to be added already exists.
- 1c1. HouR shows an error message.
Use case returns back to step 1.
Use case: Delete a remark for an employee
MSS
- User requests to delete a given remark from an employee with a given employee ID.
-
HouR deletes the remark from the list of remarks associated with the employee with the given employee ID and shows it to the user.
Use case ends.
Extensions
- 1a. User leaves out at least one of employee ID or remark.
- 1a1. HouR shows an error message.
Use case returns back to step 1.
- 1b. No employee matches given employee ID.
- 1b1. HouR shows an error message.
Use case returns back to step 1.
- 1c. Remark does not exist in the list of remarks associated with employee with given employee ID.
- 1c1. HouR shows an error message.
Use case returns back to step 1.
Use case: Increase or decrease employee overtime hours
MSS
- User requests to increase number of overtime hours taken by employee with given employee ID by a given amount.
-
HouR increases the number of overtime hours taken by employee with given employee ID by the given amount.
Use case ends.
Extensions
- 1a. User leaves out at least one of employee ID, operation (inc or dec), and amount.
- 1a1. HouR shows an error message.
Use case returns back to step 1.
- 1b. No employee matches given employee ID.
- 1b1. HouR shows an error message.
Use case returns back to step 1.
- 1c. Operation given is neither inc (for increase) nor dec (for decrease).
- 1c1. HouR shows an error message.
Use case returns back to step 1.
- 1d. Amount given is not a positive integer.
- 1d1. HouR shows an error message.
Use case returns back to step 1.
- 1e. Updating the number of leaves causes the number to exceed 72 or fall below 0.
- 1e1. HouR shows an error message.
Use case returns back to step 1.
Use case: Report employee
MSS
- User requests to generate a report of employee with given employee ID
-
HouR returns the report of employee with given employee ID
Use case ends.
Extensions
- 1a. User leaves out employee ID.
- 1a1. HouR shows an error message.
Use case returns back to step 1.
- 1b. No employee matches given employee ID.
- 1b1. HouR shows an error message.
Use case returns back to step 1.
Use case: Reset field of all employees
MSS
- User requests to reset given field of all employees
-
HouR returns the list of employees with default value for given field
Use case ends.
Extensions
- 1a. User leaves out field.
- 1a1. HouR shows an error message.
Use case returns back to step 1.
- 1b. Given field cannot be reset.
- 1b1. HouR shows an error message.
Use case returns back to step 1.
Use case: Clear employee book
MSS
- User requests to clear employee book
-
HouR clears employee book
Use case ends.
Use case: Open help page
MSS
- User requests to open help page
-
HouR shows a link that the user can copy and paste on a browser
Use case ends.
Use case: Exit HouR
MSS
- User requests to exit HouR
-
HouR exits
Use case ends.
Non-Functional Requirements
- Should work on any mainstream OS as long as it has Java 11 or above installed.
- Should be able to hold up to 1000 employees without a noticeable sluggishness in performance for typical usage.
- A user with above-average typing speed for regular English text (i.e. not code, not system admin commands) should be able to accomplish most of the tasks faster using commands than using the mouse.
- The commands should be intuitive to use and easy to remember for the average user (i.e. no complex commands)
- The system should be usable by a novice who has never managed HR data before, without a steep learning curve.
- The product is required to handle the export of reports as text files, but not their printing.
- The app only supports English.
- The system should be able to recover from crashes gracefully, and should not corrupt the data file if one occurs.
- The system should provide clear and comprehensive error messages in the event of invalid user input.
- The system should have a low resource footprint, i.e. it should not consume a lot of memory or CPU resources.
Glossary
- Mainstream OS: Windows, Linux, Unix, OS-X
- Employee: A worker in the company
- Employee book: The database of employees
- CLI: Command Line Interface
- GUI: Graphical User Interface
- MSS: Main Success Scenario
- PDPA: Personal Data Protection Act
- SRP: Single Responsibility Principle
- API: Application Programming Interface
- JSON: JavaScript Object Notation
Appendix: Instructions for manual testing
Given below are instructions to test the app manually.
Launch and shutdown
-
Initial launch
-
Download the jar file and copy into an empty folder
-
Double-click the jar file.
Expected: Shows the GUI with a set of sample employees. The window size may not be optimum.
-
-
Saving window preferences
-
Resize the window to an optimum size. Move the window to a different location. Close the window.
-
Re-launch the app by double-clicking the jar file.
Expected: The most recent window size and location is retained.
-
-
Shutdown using the UI
- Click the
Xbutton in the top right corner of the window.
Expected: The window closes.
- Click the
-
Shutdown using the
exitcommand- Type
exitin the command box and press Enter.
Expected: The window closes.
- Type
Deleting an employee
-
Deleting an employee while all employees are being shown
-
Prerequisites: List all employees using the
listcommand. Multiple employees in the list. -
Test case:
delete EID1234-5678
Expected: Employee with employee ID “EID1234-5678” is deleted from the list. Details of the deleted employee shown in the status message. Timestamp in the status bar is updated. -
Test case:
delete 0
Expected: No employee is deleted. Error details shown in the status message. Status bar remains the same.
-
Finding an employee
-
Finding an employee while all employees are being shown
-
Prerequisites: List all employees using the
listcommand. Multiple employees in the list. Employee with name “Alex” is in the list. Employee with position “manager” is in the list. Employee with employee ID “EID1234-5678” is in the list. Employee with employee ID “EID0000-0000” is not in the list. Employee with position “notAManager” is not in the list. -
Test case:
find Alex
Expected: Employee with name “Alex” is shown in the list. The status bar shows the number of employees shown in the list. -
Test case:
find manager
Expected: All employees with the word “manager” in their position are shown in the list. The status bar shows the number of employees shown in the list. -
Test case:
find EID1234-5678
Expected: Employee with employee ID “EID1234-5678” is shown in the list. The status bar shows the number of employees shown in the list. -
Test case:
find EID0000-0000
Expected: No employee is shown in the list. The status bar shows the number of employees shown in the list. -
Test case:
find
Expected: Invalid command format error message is shown in the status bar.
-
-
Finding an employee when only some employees are being shown.
-
Prerequisites: List only some employees using the
find managercommand. Multiple employees in the list. Employee with name “Alex” is in the list. Three employees with position “manager” are in the list. Employee with employee ID “EID1234-5678” is in the list. Employee with employee ID “EID0000-0000” is not in the list. Employee with position “notAManager” is not in the list. -
Try the test cases in the previous section (Finding an employee while all employees are being shown)
Expected: Same as the previous section.
-
-
Finding an employee in an empty employee book
-
Prerequisites: Clear the employee book using the
clearcommand. -
Enter any valid
findcommand similar to previous sections.
Expected: No employee is found in the list.
-
Generating a report for an employee
-
Generating report while all employees are being shown
-
Prerequisites: List all employees using the
listcommand. Multiple employees in the list. Employee with employee ID “EID1234-5678” is in the list. Employee with employee ID “EID0000-0000” is not in the list. -
Test case:
report EID1234-5678
Expected: The report of employee with employee ID “EID1234-5678” is shown in the status bar. The report is also downloaded as a text file in a directory called “reports” in the same directory as the jar file. -
Test case:
report EID0000-0000
Expected: No report is shown in the status bar. Error details about the invalid employee ID shown in the status bar. No report is downloaded. -
Test case:
report
Expected: Invalid command format error message is shown in the status bar.
-
-
Generating report while only some employees are being shown.
-
Prerequisites: List only some employees using the
find managercommand. Multiple employees in the list. Employee with employee ID “EID1234-5678” is in the list. Employee with employee ID “EID0000-0000” is not in the list. -
Try the test cases in the previous section (Generating report while all employees are being shown) Expected: Same as the previous section.
-
-
Generating report with an empty employee book
-
Prerequisites: Clear the employee book using the
clearcommand. -
Try the test cases in the previous section (Generating report while all employees are being shown) Expected: Same as the previous section.
-
Sorting a list
-
Sorting the list of employees while all employees are being shown
-
Prerequisites: List all employees using the
listcommand. At least 1 employee is in the list. -
Test case:
sort f/salary in/asc
Expected: Employees will be sorted based on their salaries in ascending order. Details of the sorted employee list shown in the status message. -
Test case:
sort f/phone in/ascorsort f/department in/desc
Expected: List is not sorted (field phone cannot be used to sort). Error details shown in the status message. -
Test case:
sort f/name in/ascendingorsort f/department in/random
Expected: List is not sorted (order parameter can only be asc or desc). Error details shown in the status message.
-
-
Sorting the list of employees when only some employees are being shown
-
Prerequisites: Filter some employees using the
find Marketingcommand. Some employees in the list. -
Try the test cases in the previous section (Sorting the list of employees while all employees are being shown) Expected: Same as the previous section
-
{other invalid inputs are possible}
Adding Leave for an Employee
-
Adding leave while all employees are being shown
-
Prerequisites: List all employees using the
listcommand. At least 1 employee is in the list. Employee with employee ID “EID1234-5678” is in the list, and has one leave date “2023-11-11” in his LeaveList. -
Test case:
addleave id/EID1234-5678 from/2023-12-04 to/2023-12-05
Expected: The leave dates “2023-12-04” and “2023-12-05” are added to the leave list of the employee with ID “EID1234-5678”. Details of the employee’s leave list shown in the result display. -
Test case:
addleave id/EID0000-0000 from/2023-12-04 to/2023-12-05
Expected: No employee leave is added (ID does not exist). Error details shown in the result display. -
Test case:
addleave id/EID12345678 from/2023-12-04 to/2023-12-05oraddleave id/EID1234-5678 from/2023-30-11 to/2023-30-11
Expected: No employee leave is added (incorrect field format). Error details shown in the result display. -
Test case:
addleave id/EID1234-5678 from/2023-11-11 to/2023-11-13
Expected: No employee leave is added (leave date(s) already exists). Error details shown in the result display. -
Test case:
addleave id/EID1234-5678 from/2023-12-05 to/2023-12-04
Expected: No employee leave is added (invalid date order). Error details shown in the result display.
-
-
Adding leave while only some employees are being shown
-
Prerequisites: Filter some employees using the
find Marketingcommand. Some employees in the list. Employee with ID “EID1234-5678” has leaves “2023-11-11” and “2023-11-12” and is not in displayed list. -
Try the test cases in the previous section (Adding leave while all employees are being shown) Expected: Same as the previous section
-
{other invalid inputs are possible}
Deleting Leave for an Employee
-
Deleting leave while all employees are being shown
-
Prerequisites: List all employees using the
listcommand. At least 1 employee is in the list. Employee with employee ID “EID1234-5678” is in the list, and has leaves “2023-12-01”, “2023-12-02”, and “2023-12-03”. -
Test case:
deleteleave id/EID1234-5678 from/2023-12-01 to/2023-12-02
Expected: The leave dates “2023-12-01” and “2023-12-02” are deleted from the leave list of the employee with ID “EID1234-5678”. Details of the employee’s leave list shown in the result display. -
Test case:
deleteleave id/EID0000-0000 from/2023-12-04 to/2023-12-05
Expected: No employee leave is deleted (ID does not exist). Error details shown in the result display. -
Test case:
deleteleave id/EID12345678 from/2023-12-04 to/2023-12-05ordeleteleave id/EID1234-5678 from/2023-30-11 to/2023-30-11
Expected: No employee leave is deleted (incorrect field format). Error details shown in the result display. -
Test case:
deleteleave id/EID1234-5678 from/2023-12-05 to/2023-12-04
Expected: No employee leave is deleted (invalid date order). Error details shown in the result display. -
Test case:
deleteleave id/EID1234-5678 from/2023-12-04 to/2023-12-05
Expected: No employee leave is deleted (no leaves exist between “2023-12-04” and “2023-12-05”). Error details shown in the result display.
-
-
Deleting leave while only some employees are being shown
-
Prerequisites: Filter some employees using the
find Marketingcommand. Some employees in the list. Employee with ID “EID1234-5678” has leaves “2023-12-01”, “2023-12-02”, and “2023-12-03” and is not in displayed list. -
Try the test cases in the previous section (Deleting leave while all employees are being shown) Expected: Same as the previous section
-
{other invalid inputs are possible}
Editing Leave for an Employee
-
Editing leave while all employees are being shown
-
Prerequisites: List all employees using the
listcommand. Multiple employees in the list. Employee with ID “EID1234-5678” has leaves “2023-11-01” and “2023-11-02”. -
Test case:
editleave id/EID1234-5678 old/2023-11-01 new/2023-11-03
Expected: The previous leave date “2023-11-01” of the employee with ID “EID1234-5678” will be changed to “2023-11-03”. Details of the edited employee shown in the result display. -
Test case:
editleave id/EID0000-0000 old/2023-11-01 new/2023-11-03
Expected: No employee leave is edited (ID does not exist). Error details shown in the result display. -
Test case:
editleave id/12345678 old/2023-11-01 new/2023-11-03oreditleave id/EID1234-5678 old/2023-28-11 new/2023-30-11
Expected: No employee leave is edited (incorrect field format). Error details shown in the result display. -
Test case:
editleave id/EID1234-5678 old/2023-11-03 new/2023-11-04
Expected: No employee leave is edited (old leave doesn’t exist). Error details shown in the result display. -
Test case:
editleave id/EID1234-5678 old/2023-11-01 new/2023-11-02
Expected: No employee leave is edited (new leave already exists). Error details shown in the result display.
-
-
Editing leave while only some employees are being shown
-
Prerequisites: Filter some employees using the
find Marketingcommand. Some employees in the list. Employee with ID “EID1234-5678” has leaves “2023-11-01” and “2023-11-02” and is not in displayed list. -
Try the test cases in the previous section (Editing leave while all employees are being shown) Expected: Same as the previous section
-
{other invalid inputs are possible}
Listing Employees on Leave on a specified date
-
Listing employees on leave while all employees are being shown
-
Prerequisites: List all employees using the
listcommand. At least one employee in the list. Employee with ID “EID1234-5678” has leaves “2023-11-01” and “2023-11-02”. No employees on leave on “2023-11-11”. -
Test case:
listleave on/2023-11-01
Expected: The employees on leave on the specified date are displayed in the employee list. Details of the number of employees on leave on the specified date shown in the result display. -
Test case:
listleave on/2023-11-11
Expected: No employee displayed (no employees on leave on specified date). Details of the number of employees on leave on the specified date shown in the result display. -
Test case:
listleave on/11-11-2023
Expected: No employee displayed (incorrect field format). Error details shown in the result display.
-
-
Listing employees on leave while only some employees are being shown
-
Prerequisites: Filter some employees using the
find Marketingcommand. Some employees in the list. Employee with ID “EID1234-5678” has leaves “2023-11-01” and “2023-11-02” and is not in displayed list. -
Try the test cases in the previous section (Listing employees on leave while all employees are being shown) Expected: Same as the previous section
-
{other invalid inputs are possible}
Adding Remark for an Employee
-
Adding remark while all employees are being shown
-
Prerequisites: List all employees using the
listcommand. Multiple employees in the list. Employee with ID “EID1234-5678” has remarks “team player” and “slow on deadlines”. -
Test case:
addremark id/EID1234-5678 r/good leaderoraddremark id/EID1234-5678 r/GOOD LEADER
Expected: The remark “good leader” or “GOOD LEADER” will be added to the remark list of the employee with id “EID1234-5678”. Details of the edited employee shown in the result display. -
Test case:
addremark id/EID0000-0000 r/good leader
Expected: No remark is added (no existing ID). Error details shown in the result display. -
Test case:
addremark id/EID1234-5678 r/team playeroraddremark id/EID1234-5678 r/TEAM PLAYER
Expected: No remark is added (remark already exists). Error details shown in the result display.
-
-
Adding remark while only some employees are being shown
-
Prerequisites: Filter some employees using the
find Marketingcommand. Some employees in the list. Employee with ID “EID1234-5678” has remarks “team player” and “slow on deadlines”, and is not in displayed list. -
Try the test cases in the previous section (Adding remark while all employees are being shown) Expected: Same as the previous section
-
{other invalid inputs are possible}
Deleting Remark for an Employee
-
Deleting remark while all employees are being shown
-
Prerequisites: List all employees using the
listcommand. Multiple employees in the list. Employee with ID “EID1234-5678” has remarks “team player” and “slow on deadlines”. -
Test case:
deleteremark id/EID1234-5678 r/slow on deadlinesoraddremark id/EID1234-5678 r/SLOW ON DEADLINES
Expected: The remark “slow on deadlines” will be deleted from the remark list of the employee with ID “EID1234-5678”. Details of the edited employee shown in the result display. -
Test case:
deleteremark id/EID0000-0000 r/slow on deadlines
Expected: No remark is deleted (no existing ID). Error details shown in the result display. -
Test case:
deleteremark id/EID1234-5678 r/bad workerordeleteremark id/EID1234-5678 r/BAD WORKER
Expected: No remark is deleted (remark doesn’t exist). Error details shown in the result display.
-
-
Deleting remark while only some employees are being shown
-
Prerequisites: Filter some employees using the
find Marketingcommand. Some employees in the list. Employee with ID “EID1234-5678” has remarks “team player” and “slow on deadlines”, and is not in displayed list. -
Try the test cases in the previous section (Deleting remark while all employees are being shown) Expected: Same as the previous section
-
{other invalid inputs are possible}
Resetting Fields for all Employees
-
Resetting fields while all employees are being shown
-
Prerequisites: List all employees using the
listcommand. Multiple employees in the list. -
Test case:
reset f/overtimeorreset f/OVERTIMEorreset f/leavesorreset f/LEAVES
Expected: The overtime hour or leaveList of all employees will be reset to their default values 0 or empty list. -
Test case:
reset f/nameorreset f/salaryorreset f/blah
Expected: Resetting is not done (not able to reset those fields). Error details shown in the result display.
-
-
Resetting field while only some employees are being shown
-
Prerequisites: Filter some employees using the
find Marketingcommand. Some employees in the list. -
Try the test cases in the previous section (Resetting fields while all employees are being shown) Expected: Same as the previous section
-
{other invalid inputs are possible}
Updating overtime hours for an employee
-
Updating overtime hours while all employees are being shown
-
Prerequisites: List all employees using the
listcommand. Multiple employees in the list. Employee with ID “EID1234-5678” has overtime hours 0. -
Test case:
overtime id/EID1234-5678 o/inc a/20
Expected: The overtime hours of the employee with ID “EID1234-5678” will increase by 20. Details of the edited employee shown in the result display. -
Test case:
overtime id/EID0000-0000 o/inc a/20
Expected: No overtime hours is updated (no existing ID). Error details shown in the result display. -
Test case:
overtime id/ o/inc a/20orovertime id/EID1234-5678 o/ a/20orovertime id/EID1234-5678 o/inc
Expected: No overtime hours is updated (empty fields). Error details shown in the result display.
-
-
Updating overtime hours while only some employees are being shown
-
Prerequisites: Filter some employees using the
find Marketingcommand. Some employees in the list. Employee with ID “EID1234-5678” has overtime hours 10, and is not in displayed list. -
Try the test cases in the previous section (Updating overtime hours while all employees are being shown) Expected: Same as the previous section
-
{other invalid inputs are possible}
Saving data
-
Saving data
-
Add a new employee using the
addcommand. -
Close the app.
-
Launch the app again.
Expected: The new employee should still be present.
-
-
Dealing with missing data file
-
Navigate to the folder containing the jar file. The data file should be in data/hour.json.
-
Delete hour.json.
-
Launch the app by double-clicking the jar file.
Expected: The app should create a new hour.json file with sample data in the data folder.
-
-
Dealing with corrupted data file
-
Navigate to the folder containing the jar file. The data file should be in data/hour.json.
-
Open hour.json in a text editor.
-
Corrupt the file by deleting some characters.
-
Launch the app by double-clicking the jar file.
Expected: The app should detect the corrupted file and show an error message in the console. The app should create a new hour.json file with an empty employee book in the data folder.
-
Appendix: Efforts
This section documents the efforts that went into the development of this project, as well as the challenges faced.
Difficulty Level and Challenges Faced
We would rate the difficulty level of this project as π/5.
This is because the project codebase and architecture were initially quite challenging to understand, and we had to spend a significant amount of time tracing through the code and understanding how the different components of the project interacted with each other. However, once we understood the architecture of the project, it was relatively straightforward to add most of the new features and modify existing features.
The initial use of a forking workflow was extremely tedious and time-consuming, with lots of merge conflicts, slowing down our progress. However, we decided to switch over to a branching workflow, increasing our productivity and efficiency when delivering v1.3 and v1.4.
There were a few challenging features, such as the sort command, which required us to modify the code at multiple layers of abstraction, and the report command, which was one of the few commands that required its own storage class and methods. However, we were able to implement these features successfully after some effort.
Writing our own tests as well as modifying existing tests, while not particularly difficult, was quite time-consuming, and required us to spend a significant amount of time understanding the existing tests and how they worked.
Finally, writing documentation was a novel experience to us, and necessitated both a deep understanding of the codebase and a good grasp of documentation best practices. Making UML diagrams for the documentation was a particular challenge because of our inexperience with coding in UML. However, after writing the documentation for a few methods, the rest were relatively straightforward to write.
Given the challenges we faced and the novelty of some parts of the project, we would rate the difficulty level of this project as π/5.
Effort Required
In the project, we invested a moderate level of effort to ensure the successful development and delivery of our product. Here are some of the different aspects of our team efforts:
- Group Effort
Collaborative discussions have been held weekly to brainstorm ideas, plan sprints, and address challenges. We had discussed and assigned roles to every team member such that we could diligently contribute our own skills and expertise, striking a balance between efficiency and thoroughness. We also try out best to help each other when we can, especially since we understand that not every teammate is able to deliver as much due to other commitments.
- Project Management
Code reviews and testing processes have been carried out meticulously to maintain code quality and identify potential issues early on. We also demonstrated a commitment to meeting project milestones and deadlines, always having mid-week reminders of the tasks we have to complete and always assigning an earlier internal deadline to give as leeway to check before the actual submission.
Achievements of the Project
This project has been a very invaluable experience where we got to have a taste of how actual software engineering projects were — exploring different types of workflows, different types of testing, etc.
One of the things that we are most proud of is the bettering of the UI. Though the change was not very extravagant, the change in colour scheme was a feat in itself since we honestly did not aim to care a lot about our UI. We also managed to add icons beside the employee attributes in each employee card which we believe made it more readable for the users.
Another feature we are proud of is our report feature that allows our users to generate reports as txt files for each employee. While it might not contain a lot of information yet, we believe that it was a great starting point considering the time-constraint we had for this project, and we plan to extend and further develop this feature, improving the experience for our users.
Overall, we are proud of our project, and we believe that we have done our best with all the constraints and challenges we faced. We are happy with the result and believe that our product will meet the needs of our target audience.
Appendix: Planned Enhancements
Remark not shown in GUI employee list
Problem:
- In our current implementation, the remark is not displayed on the employee list in GUI.
- Users have to use report command to display employee remarks in message box.
Solution:
- We will update the employee card in the GUI to display remarks of the employees upon clicking on it.
- This is to ensure the displayed employee card is not cluttered with too much information.
Deleting a remark requires typing the whole remark
Problem:
- In our current implementation, deleting a remark requires the user to type in the remark exactly as it is typed in when added, i.e. exactly as it is shown in the message box.
- This can be tedious, especially for long remarks.
Solution:
- A solution is to address a remark by its index (based on date added) instead of its value, so that
deleteremark id/EMPLOYEE_ID 1is enough to delete the first remark of employee with employee ID EMPLOYEE_ID.
Adding a leave with a date far in the past and future
Problem:
- In our current implementation, users are able to add a leave for an employee with date that is too far in the past
and in the future, such as
1111-11-11and2222-12-12. - While users should be able to add a past and future dates as leaves for record keeping purposes, we see that being able to input a date this extreme is excessive and highly unrealistic.
Solution:
- We will enhance the leave list so that there are three separate lists, one for the current year, one for the previous year, and one for the following year.
- Users will only be allowed to add leave dates that fall within the time period of the beginning of the previous year to the end of the following year, and the number of annual leaves allocated will be calculated accordingly.
- For example, users will be able to add leave dates that fall in 2022, 2023, and 2024. Leaves taken in each year will be tracked separately.
No efficient way to view a specific employee’s leave dates
Problem:
- In our current implementation, users can only view which employees are on leave on specific dates using
listleavecommand. There is currently no specific command that allows users to view leave dates taken by a specific employee. - The list of an employee’s leave date can only be displayed when a user adds, edits, or deletes a leave date of that employee.
Solution:
- A possible solution is to display the leaves taken by an employee when the user executes a report command on the employee.
Two employees are allowed to have the same phone number or email
Problem:
- In our current implementation, adding an employee with the same phone number or email as another existing employee is allowed.
- This is caused by our decision to only check same employee by comparing by employee ID.
- This might lead to unintended duplicates.
Solution:
- We will update the check for the same employee to check not only by employee ID but also by phone number and email.
Unable to view the number of leaves remaining when adding a leave period that exceeds maximum number of leaves
Problem:
- In our current implementation, if a user tries to add a leave for an employee but that exceeds the maximum number of allowed employee leaves, the app only displays an error message telling the user it exceeds the remaining number of leaves.
- However, the app does not show the remaining number of leaves, so the fastest method is to use report command to display the current amount of leaves taken by the employee and perform manual subtraction to obtain remaining number of leaves.
Solution:
- We plan to revamp the error messages pertaining to this issue to display as much information as possible to the user, in this case the remaining number of leaves.
- In this case, it is to change the error message into this:
This leave period exceeds the number of leaves remaining for this employee
Number of leaves remaining: 1
Unable to view the number of overtime hours remaining when updating overtime hours that exceeds the range of allowed number of overtime hours
Problem:
- In our current implementation, if a user tries to update the number of overtime hours for an employee and exceeds the maximum number of allowed overtime hours or make it fall below zero, the app only displays an error message telling the user it exceeds the range of allowed number of overtime hours.
- However, the app does not show the remaining number of overtime hours, so the fastest method is to use report command to display the current amount of overtime hours taken by the employee and perform manual subtraction to obtain remaining number of overtime hours.
Solution:
- We plan to revamp the error messages pertaining to this issue to display as much information as possible to the user, in this case the remaining number of overtime hours.
- In this case, it is to change the error message into this:
Number of overtime hours should not be above 72 or below 0
Number of overtime hours remaining: 2
Unclear error message for invalid email address
Problem:
- In our current implementation, when a user keys in an invalid email address, the error message shown is very long and slightly inconsistent.
- This will highly confuse users who have very complex email addresses and keys the wrong email address by mistake.
Solution:
- We intend to keep error messages as short but as unambiguous as possible, so that users are able to identify their misinputs and fix them accordingly.
- In this case, it is to shorten the email error message into this:
Emails should be of the format local-part@domain-name and adhere to the following constraints:
1. The local-part should only contain alphanumeric , +, _, ., or - characters.
 The local-part must not start or end with any special characters.
2. The domain-name is made up of domain labels separated by either hyphens or periods. The domain name must:
- end with a domain label at least 2 characters long.
- have each domain label contain only alphanumeric characters.
Edit command error message is inconsistent with respect to invalid ID
Problem:
- In our current implementation, when a user inputs an invalid index in an edit command, the error messages differ with different user inputs.
- If index is less than one, i.e. 0 and below, the error message indicates an invalid command format due to the parser checking if index is less than one.
- If index is more than number of employees currently displayed, the error message only indicates an invalid index due to the command class being the one checking if index is too high.
- This inconsistency between error messages on the same issue can be confusing for users.
Solution:
- We plan to let the command class take care of determining whether an index is invalid or not while the parser class only needs to check if index is an integer.
- This will establish consistency when a user inputs a wrong index regardless if it’s below one or above current number of employees displayed.
- It will still keep the invalid command format error message if index input is not an integer.
Inconsistent arrangement of leaves in the leave list
Problem:
- In our current implementation, the leaves in the leave list shown in the result display are sorted according to when they were added to the employee.
- Moreover, editing a leave date replaces the previous date with the new date, rather than deleting the previous date and adding the new date to the end of the leave list.
- Such inconsistency can be confusing for users, and the current arrangement might lead to trouble finding specific leave dates in a long list of dates.
Solution:
- We plan to standardise the arrangement of the leave dates, such that they are sorted in chronological order.
- After any command that changes the leave list (e.g.
addleave,editleave), the leave list will be re-sorted, with the earliest date at the top of the list and the latest date at the end of the list. - This will reduce any inconsistencies, and make finding specific leave dates easier for users.